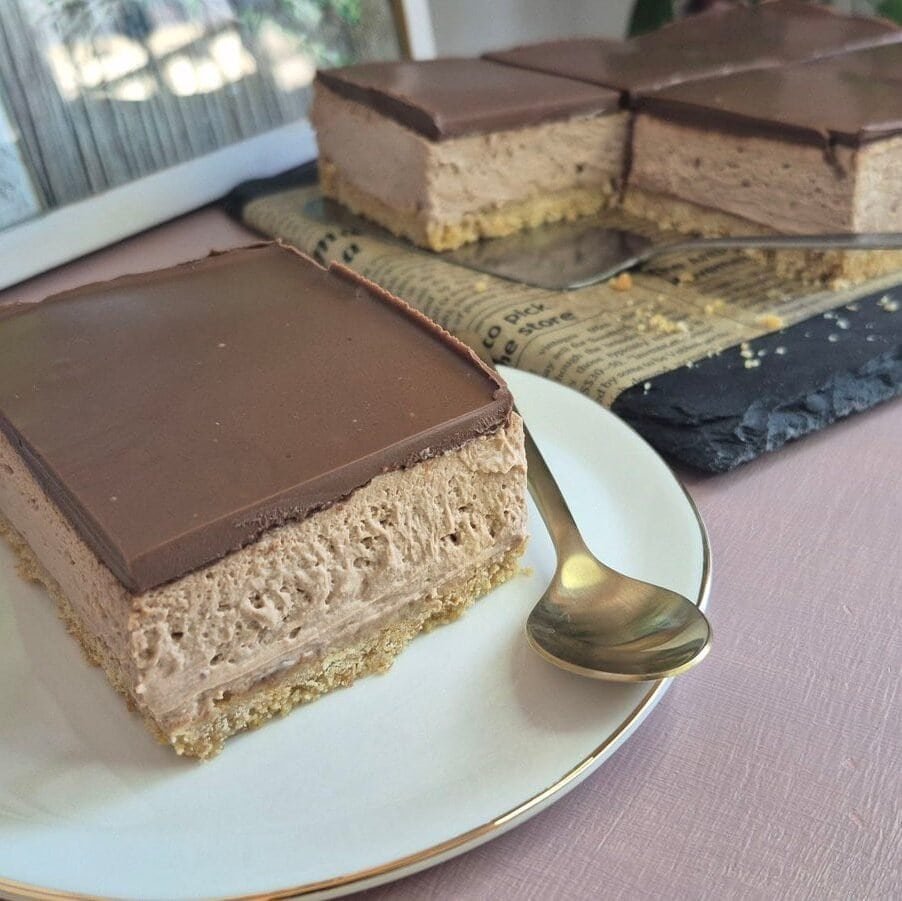
If you’re a chocolate lover, this recipe is about to become your new obsession! Imagine a dessert that combines the crunch of biscuits, the creamy richness of mascarpone and sour cream, and the heavenly chocolate-hazelnut magic of Nutella — that’s exactly what these Nutella Chocolate Bars are all about. Whether it’s a weekend indulgence, a party treat, or just a moment of self-love, this dessert promises to make every bite unforgettable.
In this post, I’m going to take you through every detail of making these bars. I’ll give you tips, tricks, and variations to make them truly spectacular. And yes, I’ll be sprinkling in plenty of emojis to keep things fun along the way!
Ingredients That Make Magic Happen
Before we dive into the process, let’s talk about what goes into these bars and why each ingredient is crucial for creating that perfect balance of texture and flavor.
Base Ingredients
- 150 g biscuits: The base of our bars is made from crushed biscuits. Think of these as the crunchy, supportive foundation of our dessert. Digestive biscuits, graham crackers, or even Marie biscuits work wonderfully. The key is that they are lightly sweet and crunchy.
- 50 g butter: Butter binds the crushed biscuits together while adding a creamy richness that melts in your mouth. Always use unsalted butter to keep control of sweetness.
- 3–4 tablespoons milk: Milk softens the mixture just enough to make it moldable, but not soggy. It also helps the butter coat the biscuits evenly for that perfect pressable texture.
Filling Ingredients
- 250 ml sour cream: This adds a subtle tang that balances the sweetness of Nutella and mascarpone. It also helps the filling hold a light, airy texture without being too dense.
- 250 g mascarpone cheese: Mascarpone is the superstar here. Its velvety creaminess creates that luxurious mouthfeel that makes this dessert feel indulgent.
- 2 tablespoons Nutella : Ah, the heart of the dessert! Nutella brings that unmistakable hazelnut-chocolate flavor that pairs perfectly with creamy mascarpone and slightly tangy sour cream.
Topping Ingredients
- 3 tablespoons Nutella: Melted and poured over the top, Nutella becomes a glossy, decadent crown for your bars. It’s the cherry on top, literally, in chocolate form.
Step-By-Step Procedure: From Simple Ingredients to Pure Bliss
Now that you have your ingredients lined up, let’s walk through making these bars. I’ll include tips that can turn an already amazing dessert into something you might just brag about to your friends (and for good reason).
Step 1: Making the Base
- Crush your biscuits into fine crumbs. You can do this in a food processor for speed or place them in a sealed plastic bag and roll with a rolling pin — bonus points for stress relief!
- Melt the butter and mix it with the crumbs. Add milk gradually, one tablespoon at a time, until the mixture feels like slightly damp sand.
- Press the mixture evenly into a 20×20 cm mold. A glass or spoon works perfectly for compacting it. This ensures the base holds together nicely when you slice the bars.
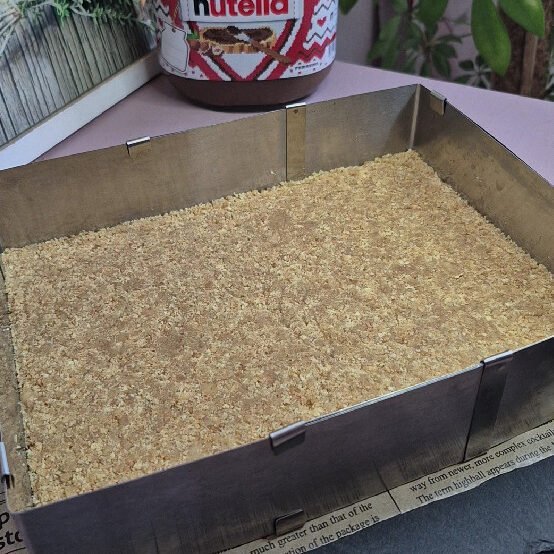
Pro tip: If you like an extra crunch, toast your biscuits lightly before crushing them. It enhances the flavor and aroma beautifully.
Step 2: Preparing the Filling
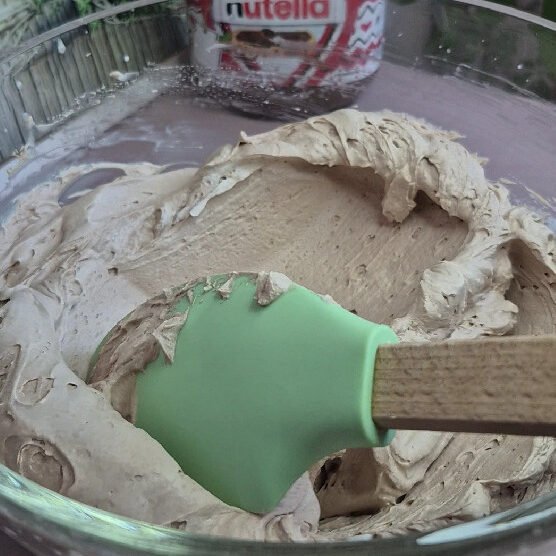
- Whip the sour cream until it’s smooth and slightly fluffy. You don’t want it too thin, but it should be soft enough to blend easily with the other ingredients.
- Add the mascarpone and Nutella. Continue whisking until you have a semi-solid, creamy filling. Think of it as rich enough to hold shape, but still soft enough to spread evenly.
- Spread the filling over the chilled biscuit base. Use a spatula to smooth it out evenly.
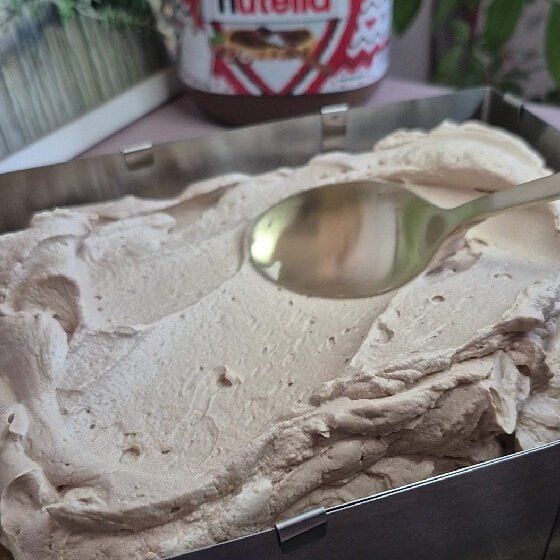
- Return it to the fridge for about 1 hour to allow the filling to firm up. This step is crucial — patience pays off!
Pro tip: To avoid streaks of Nutella, make sure it’s at room temperature before mixing it with the mascarpone and sour cream. A cold Nutella can be tricky to blend.
Step 3: Topping Magic
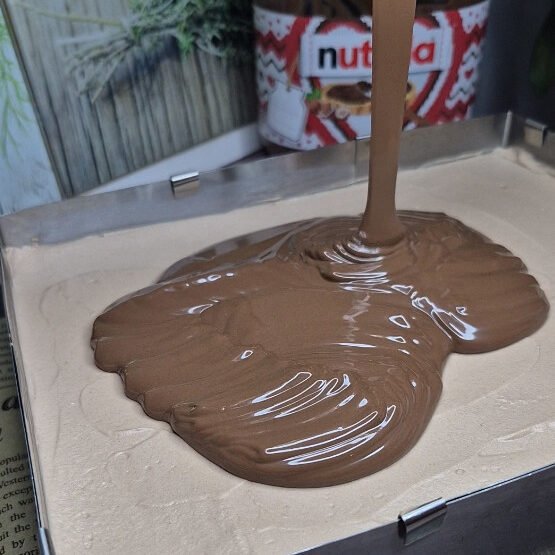
- Melt 3 tablespoons of Nutella over a steamer or gently in a microwave. Stir constantly to keep it smooth and shiny.
- Pour the melted Nutella over the set filling. Use a spatula to gently spread it evenly across the surface.
- Refrigerate the bars for 3–4 hours. This final chill allows the topping to set and makes slicing clean, perfect squares possible.
Pro tip: For a glossy finish, slightly warm the top layer with a hairdryer on a very low setting after spreading. It makes the Nutella shimmer like chocolate glass!
Serving Ideas and Presentation
These bars are versatile. You can serve them directly from the fridge for a firm texture, or let them sit at room temperature for a slightly softer bite. Here are a few fun serving ideas:
- Chocolate drizzle: Add extra melted chocolate in a zigzag pattern on top.
- Nut garnish: Sprinkle crushed hazelnuts on top for crunch and visual appeal.
- Fruit pairing: Fresh strawberries or raspberries add a bright contrast to the rich chocolate.
- Party squares: Cut them into small bite-sized squares and serve on a decorative platter. Perfect for parties or potlucks!
Why This Recipe Works So Well
The magic of these bars lies in the balance of textures and flavors:
- Crunchy base vs. creamy filling: The biscuit base provides a sturdy, crunchy layer while the filling melts in your mouth.
- Sweet vs. tangy: Nutella and mascarpone are indulgently sweet, but the sour cream adds a gentle tang that prevents the dessert from feeling overly heavy.
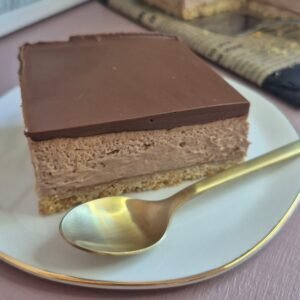
- Visual appeal: A glossy Nutella topping makes these bars look as good as they taste.
Variations to Make It Your Own
If you want to experiment, here are some fun variations to try:
- Nutella + Coffee: Add a teaspoon of instant coffee to the filling for a mocha twist.
- Nutella + Peanut Butter: Swirl a tablespoon of peanut butter into the filling for a nutty flavor explosion.
- Nutella + Fruits: Layer thin slices of banana or strawberries between the base and filling for a fruity surprise.
- Nutella + Chocolate Chips: Mix mini chocolate chips into the filling for extra texture and chocolatey bites.
Fun Facts About Nutella and Chocolate
- Did you know Nutella was created in 1940 in Italy? Originally, it was a chocolate-hazelnut paste called “Pasta Gianduja.” 🇮🇹
- Chocolate has been associated with happiness for centuries. Its compounds can trigger the release of endorphins, giving you a little natural mood boost!
- Combining chocolate with creamy cheese (like mascarpone) isn’t just delicious — it creates a luscious texture contrast that feels gourmet even if you’re making it at home.
Final Thoughts
Making these Nutella Chocolate Bars isn’t just about dessert — it’s about creating a little moment of joy in your day. From crushing the biscuits to watching the Nutella topping set, each step is satisfying and rewarding. And when you finally take that first bite… well, let’s just say, it’s worth every second.
Whether you’re serving them at a special occasion or keeping them all to yourself (no judgment here), these bars are sure to impress. So grab your ingredients, follow the steps, and prepare to enter a chocolate-hazelnut heaven!
These bars are a perfect combination of crunchy, creamy, and chocolatey, making them a dessert you’ll want to make again and again.
Nutella Chocolate Bars
Ingredients
Base
- 150 g biscuits crushed
- 50 g butter melted
- 3 –4 tablespoons milk
Filling
- 250 ml sour cream
- 250 g mascarpone cheese
- 2 tablespoons Nutella
Topping
- 3 tablespoons Nutella
Instructions
- Combine crushed biscuits, melted butter, and milk until evenly mixed. Press firmly into the bottom of a 20 × 20 cm pan (use the back of a spoon or a glass). Refrigerate while you make the filling.
- Whisk sour cream until smooth and slightly airy. Add mascarpone and 2 tablespoons Nutella, then whisk until creamy and semi-solid.
- Spread filling evenly over the chilled base. Smooth the top and refrigerate for 1 hour to set.
- Melt 3 tablespoons Nutella gently over a steamer until smooth and pourable. Pour over the set filling and spread evenly.
- Refrigerate for 3–4 hours, or until fully set. Slice into bars and serve chilled.
Notes
- Use full-fat mascarpone and sour cream for best texture and stability.
- Let Nutella come to room temperature before mixing for a smoother filling.
- For clean slices, wipe the knife between cuts.
- Store covered in the refrigerator for up to 3 days.