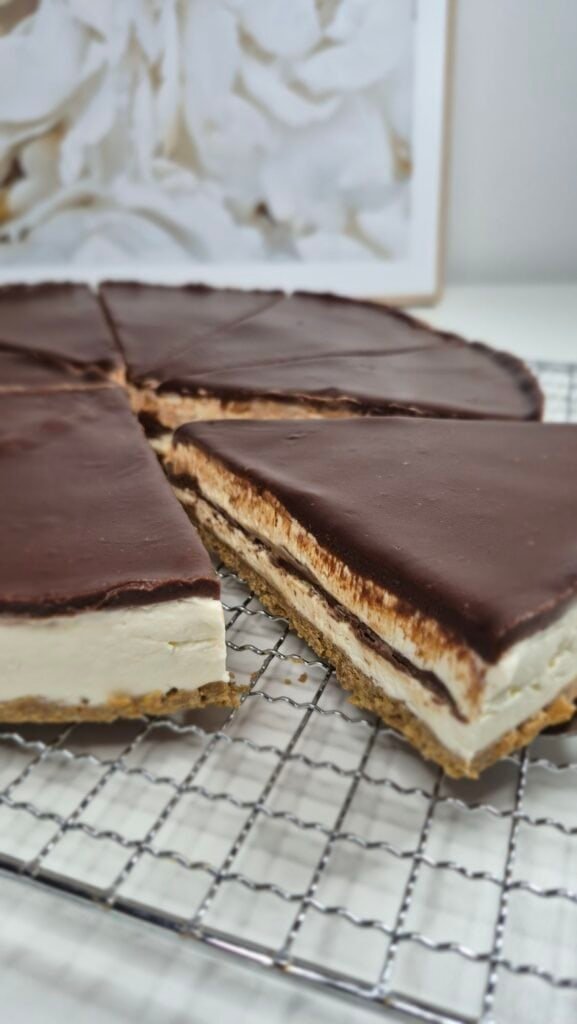
This is a chilled, no-bake cake with a biscuit base, a creamy ricotta–mascarpone filling, and a simple Kinder chocolate topping that sets like a soft ganache. The texture is the best part: the crust stays slightly sandy and buttery, the filling is light but stable, and the topping gives you that clean chocolate bite when you slice it.
It’s the kind of cake I make when I want something that looks neat on a plate, slices well, and still feels homemade (not like a supermarket mousse cake). If you keep it cold and give it enough time to set, it comes out exactly like the photos you want.
What this cake tastes like (so you know what you’re making)
- Crust: buttery biscuit base that holds together without being rock-hard.
- Filling: creamy, slightly tangy from ricotta, richer from mascarpone, and chocolatey from melted Kinder.
- Topping: smooth chocolate layer that sets softly—firm enough to cut, not hard like a candy bar.
If you’re serving kids or anyone who loves Kinder chocolate, this one disappears fast.

Ingredients (with practical notes)
Crust
- 200 g biscuits (crushed)
Digestives, tea biscuits, graham crackers, or any plain sweet biscuit works. If the biscuits are very sweet, you’ll still be fine because the filling isn’t overloaded with sugar. - 100 g butter (melted)
This is what binds the crust. Melt it fully so it mixes evenly. - 3 tbsp milk
The milk keeps the crust from turning too dry and helps it press neatly into the pan.
Filling
- 250 g ricotta cheese
Ricotta can vary a lot by brand. If yours is watery, drain it for 20–30 minutes in a sieve before you start (it makes the filling thicker and more reliable). - 250 g mascarpone
Use it cold. It gives the filling structure and a smooth finish. - 3 tbsp powdered sugar
Powdered sugar dissolves quickly and won’t feel grainy. - 250 ml heavy/whipping cream (cold, 35% fat)
Cold cream is important here. Warm cream won’t whip properly and the filling will stay loose. - 100 g Kinder chocolate (melted and slightly cooled)
Melt it gently, then let it cool for a few minutes so it doesn’t shock the dairy or seize.
Topping
- 150 g Kinder chocolate (chopped/broken up)
Smaller pieces melt faster and more evenly. - 100 ml heavy/whipping cream
Heated just until it’s about to boil—then poured over the chocolate.
Optional for decorating
- Chopped Kinder chocolate
- Crushed biscuits
- Chocolate curls
- A light dusting of cocoa (only if you like it slightly less sweet on top)
Equipment you’ll need
- 22 cm springform pan (or a cake ring + base)
- Mixing bowl + hand mixer or stand mixer
- Small saucepan + heatproof bowl (double boiler) or microwave for melting chocolate
- Spatula
- Spoon (for pressing the crust)
- Baking paper (optional but makes lifting out easier)
Step-by-step instructions
1) Make the crust
- Crush the biscuits until you have fine crumbs. A food processor is quick, but a zip-top bag and rolling pin works too.
- Melt the butter and pour it into the crumbs.
- Add 3 tablespoons of milk and mix until the crumbs look evenly moistened.
You’re looking for a “wet sand” texture: it should clump when you squeeze it. - Press the mixture into a 22 cm pan.
Use the back of a spoon to compact it firmly, especially around the edges. - Put the pan in the fridge while you make the filling (this helps it hold together later).
Quick check: If the crust looks dry and won’t pack, add a tiny splash more milk (a teaspoon at a time). If it looks greasy, you probably just need to press it harder and chill it.
2) Melt the Kinder chocolate for the filling
- Break 100 g Kinder chocolate into pieces.
- Melt it using a double boiler: place a heatproof bowl over a pot of simmering water (the bowl shouldn’t touch the water). Stir until smooth.
- Remove from heat and let it cool briefly (5–10 minutes).
You want it warm and pourable, not hot.
Tip: If the chocolate is too hot, it can loosen the cream mixture and you’ll lose thickness.
3) Make the filling
- In a mixing bowl, add ricotta + mascarpone + powdered sugar.

- Beat on medium speed until smooth. Scrape down the sides so there are no little pockets of mascarpone.
- Pour in the cold heavy cream (250 ml).
- Add the melted Kinder chocolate.
- Whip until the filling is smooth and semi-firm.

What “semi-firm” looks like:
- It should hold soft peaks and look thick enough to spread.
- It shouldn’t be runny or pour like batter.
- Don’t overwhip to the point it looks grainy—stop as soon as it thickens nicely.
- Take the crust from the fridge and spread the filling on top.

- Level it with a spatula (or the back of a spoon).
- Refrigerate for 2 hours.
4) Make the topping (simple Kinder ganache)
- Break 150 g Kinder chocolate into a bowl.
- Heat 100 ml cream in a small saucepan until it just comes to a boil (you’ll see tiny bubbles around the edge).
- Pour the hot cream over the chocolate.
- Let it sit for 1 minute, then stir until fully melted and glossy.
- Pour it over the chilled filling and gently tilt the pan so it spreads evenly.

If you want the cleanest look, pour from the center and let it flow outward—less stirring on top = smoother finish.
5) Decorate and chill again
Decorate with chopped Kinder chocolate, crushed biscuits, or keep it plain (plain looks great too).
Refrigerate for another 2 hours so the topping sets and the cake slices cleanly.
Tips that actually help (especially for clean slices)
Use cold ingredients for the filling
Ricotta, mascarpone, and cream should be cold. Warm dairy makes the filling loose and slower to set.
Drain ricotta if it looks wet
If there’s visible liquid, drain it in a sieve for 20–30 minutes. This one step prevents a soft, wobbly center.
Don’t rush the chill time
You really do need the full chill. Two hours after the filling, then two hours after the topping. Overnight is even better if you want perfect slices.
How to slice it neatly
- Use a sharp knife dipped in hot water.
- Wipe the blade between slices.
- Cut straight down—don’t saw back and forth too much.
Springform pan trick
Line the bottom with baking paper so you can lift the cake base cleanly and move slices without scraping.
Storage
- Keep covered in the fridge for up to 3 days.
- This cake doesn’t freeze well (the dairy filling can change texture once thawed), so I recommend keeping it refrigerated and eating it fresh.

No-Bake Kinder Ricotta–Mascarpone Cake
Ingredients
Crust:
- 200 g biscuits crushed
- 100 g butter melted
- 3 tbsp milk
Filling:
- 250 g ricotta cheese
- 250 g mascarpone
- 3 tbsp powdered sugar
- 250 ml heavy/whipping cream cold, 35%
- 100 g Kinder chocolate melted
Topping:
- 150 g Kinder chocolate chopped
- 100 ml heavy/whipping cream
Instructions
Mix crushed biscuits with melted butter and milk. Press into a 22 cm pan. Chill.
Melt 100 g Kinder chocolate in a double boiler and cool briefly.
Beat ricotta, mascarpone, and powdered sugar until smooth. Add cold cream and melted Kinder chocolate. Whip until smooth and semi-firm. Spread over crust. Chill 2 hours.
Heat 100 ml cream until just boiling. Pour over 150 g chopped Kinder chocolate. Stir smooth, then pour over the cake.
Decorate if desired. Chill 2 more hours. Slice and serve.
Notes
- If ricotta is watery, drain it before mixing.
- For the cleanest slices, chill overnight and use a hot knife.