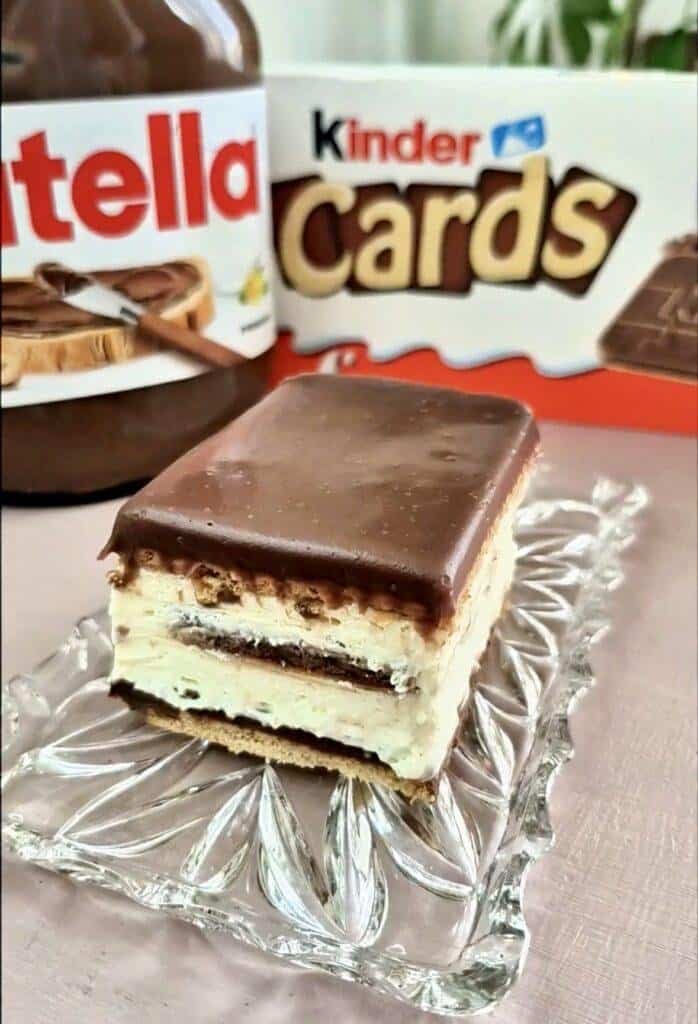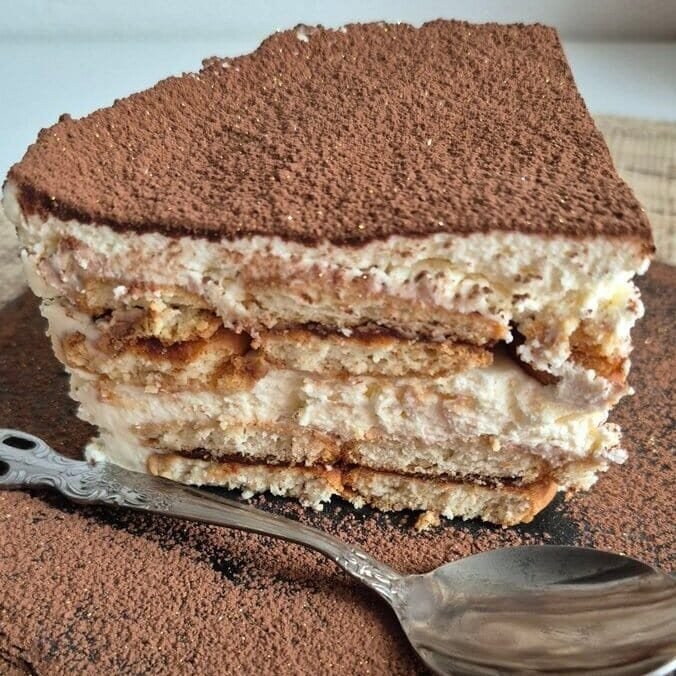
This Nutella cake is one of those desserts that looks “proper” once you slice it, but it’s built from very simple parts: biscuits softened in warm milk, a quick mascarpone-cream filling, and Nutella tucked in the middle of every bite. The texture ends up somewhere between a chilled tiramisu-style cake and a soft layered mousse slice—firm enough to cut cleanly after a few hours in the fridge, but still creamy and light on the fork.
Below is exactly how I make it in a 20 cm pan, with the little details that actually matter (how long to dip, how to keep the cream stable, how to get neat layers).
What you’ll need (and why it works)
Biscuits / cookies (300–400 g)
You can use plain tea biscuits, petit beurre, digestive-style biscuits, or any simple cookie that isn’t filled or too buttery. The amount depends on:
- the biscuit size,
- how many layers you build,
- how tight you pack them in the pan.
Tip: If your biscuits are very thin, you’ll use more grams. If they’re thick or large, you’ll use less.
Milk (150 ml, hot)
Hot milk softens the biscuits quickly and evenly so the cake slices nicely later. You’re not soaking them—just giving them a quick dip to help them soften in the fridge.
Options you can use instead of plain milk:
- half milk + half coffee
- coffee only (for a stronger tiramisu vibe)
Nutella (as needed)
There isn’t a strict gram amount here, because it depends on how generously you spread it. In practice, I’d plan on at least half a jar for a full 20 cm cake if you’re spreading every sandwich cookie properly.
Cocoa powder (2 tbsp, for dusting)
This is the finish that makes it look like a bakery cake with almost no effort. Use unsweetened cocoa.
Filling ingredients (cream layer)
Whipping cream (300 ml, cold, 35% fat)
This gives the filling its volume and lightness. The fat percentage matters: 35% whips up firm and holds.
Mascarpone (250 g)
Mascarpone makes the filling thicker and more stable than whipped cream alone, and it gives that smooth “sliceable” texture once chilled.
Powdered sugar (2 tbsp)
Just enough to lightly sweeten the cream. Nutella is already sweet, so I keep this restrained.
Equipment
- 20 cm pan (springform is easiest, but any cake pan works)
- electric mixer
- spatula
- a bowl for dipping milk/coffee
- sieve (optional, for cocoa dusting)
- baking paper (optional, but helpful)
Before you start: quick setup
- Chill the cream well (cold cream whips faster and holds better).
- If you can, chill the mixing bowl for 10 minutes too.
- Warm the milk (or coffee mix) until hot but not boiling.
- If your pan isn’t non-stick, line the base with baking paper. If you’re using a springform, lining the bottom makes transferring slices cleaner.
Step-by-step instructions (the way I layer it)
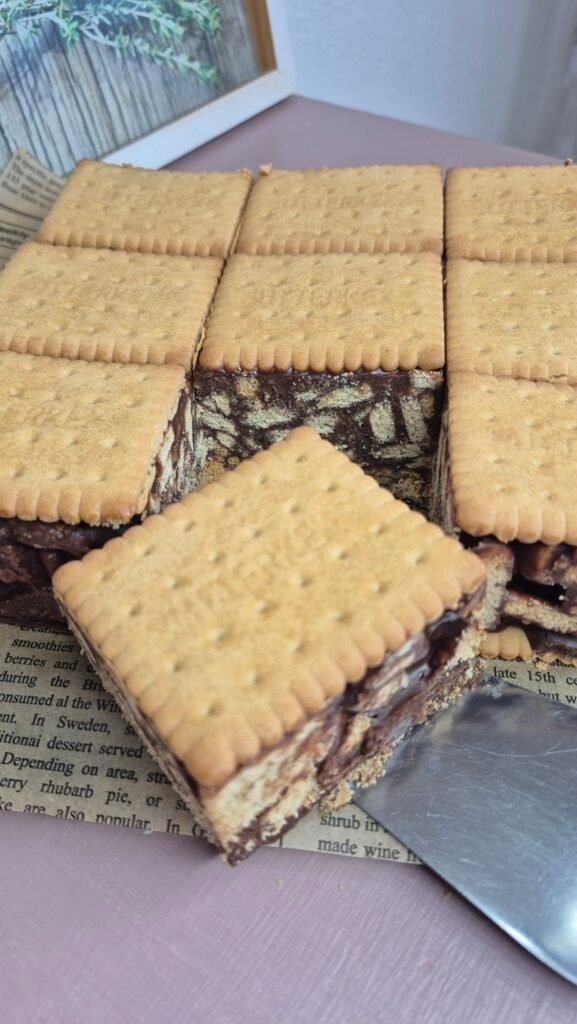
1) Make the Nutella biscuit “sandwiches”
Take one biscuit and spread about 1 teaspoon of Nutella on it.
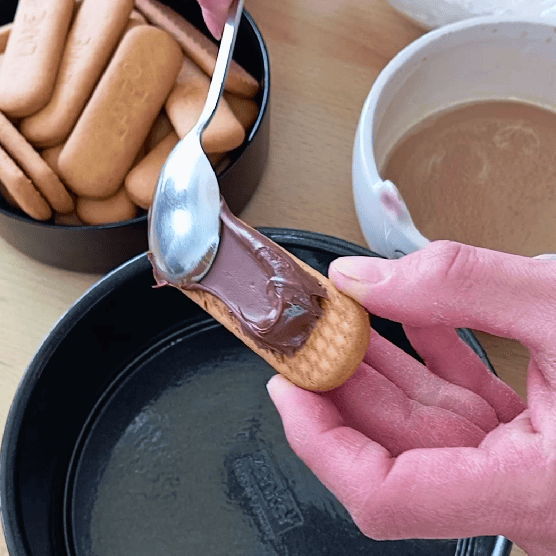
Top with another biscuit to make a little sandwich.
Repeat until you have enough to build your first layer. Don’t worry about making them perfect—once it’s layered, no one will know which one was slightly off-center.
Small trick: If your Nutella is stiff, warm it for 5–10 seconds in the microwave (just the Nutella in a bowl, not the jar). It spreads easier and you won’t break biscuits.
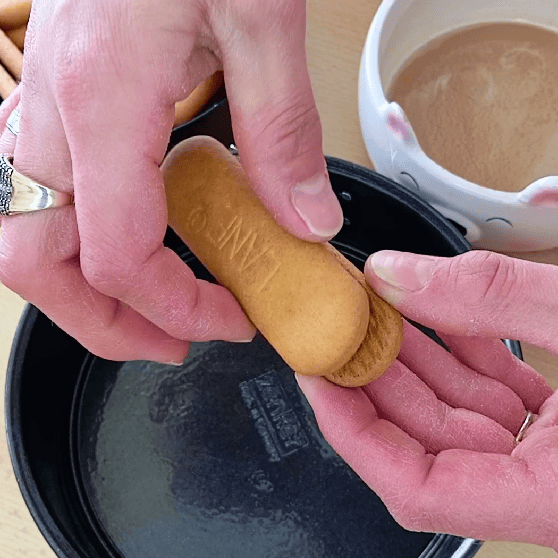
2) Dip quickly and build the first layer
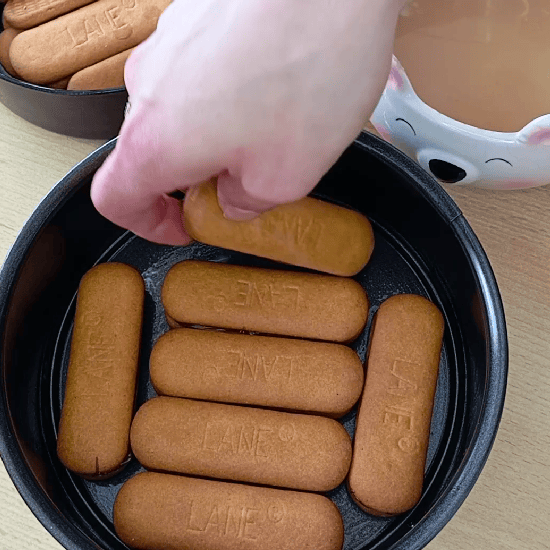
Dip each Nutella sandwich briefly into the hot milk.
“Briefly” really means a quick in-and-out—around 1 second per side. If you leave them in too long, they go overly soft and the layers can slide when you cut.
Arrange the dipped sandwiches in your 20 cm pan, covering the base. If you have gaps, break a biscuit or two to fill them—this actually helps the cake slice evenly later.
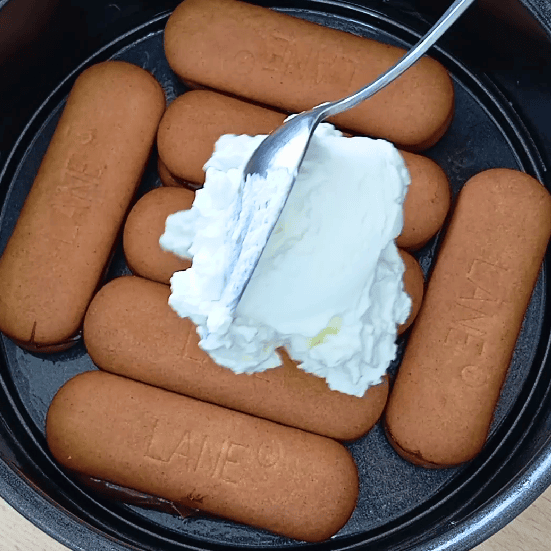
3) Whip the mascarpone filling (in the right order)
In a bowl, add:
- 250 g mascarpone
- 2 tbsp powdered sugar
Mix just until smooth—don’t overbeat mascarpone on its own; it can loosen if you keep going too long.
Now add:
- 300 ml cold whipping cream (35%)
Continue mixing until the filling becomes firm and holds its shape. You want a texture that spreads easily but doesn’t slump.
How to know it’s ready:
Lift the beaters—if the cream forms a peak that stands up (or just gently bends at the tip), you’re good.
4) Divide the filling into two parts
For the correct version of this cake, the filling is used in two layers: one in the middle and one on top. I usually just eyeball it, but you can weigh it if you want them perfectly even.
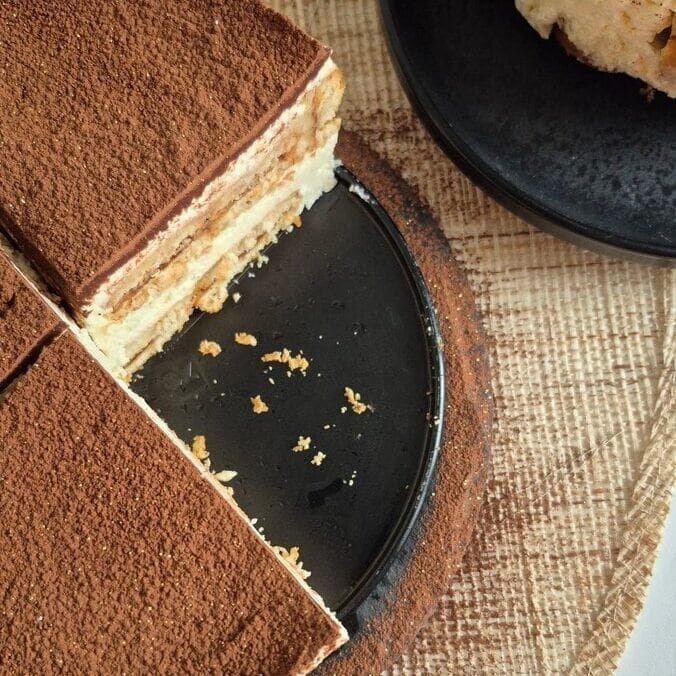
5) Layer: biscuits → cream → biscuits → cream
- Spread half of the filling over the biscuit base.
- Make a second layer of Nutella biscuit sandwiches, dip quickly, and arrange on top.
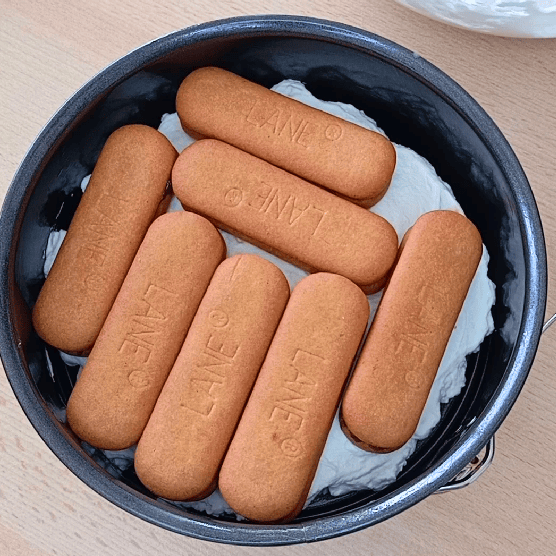
- Spread the remaining filling evenly over the second biscuit layer.
The top layer should be filling—this is what gives you that clean cocoa finish.
6) Chill (this part matters)
Refrigerate for at least 3 hours.
If you can chill it longer (4–6 hours), the slices get even neater, because the biscuits fully soften and the mascarpone layer sets more firmly. But 3 hours works if you need it the same day.
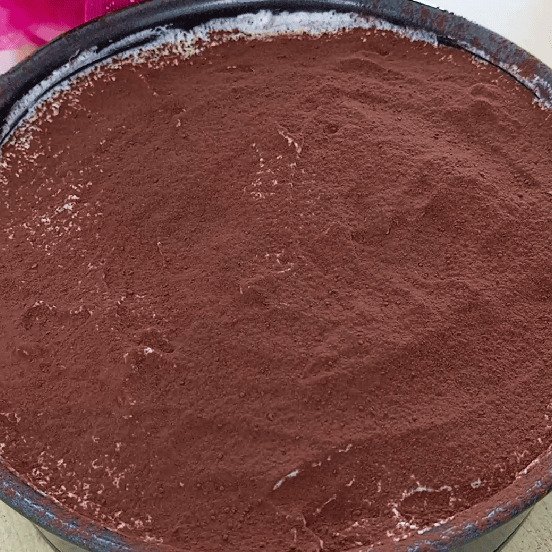
7) Cocoa finish and slicing
Right before serving, dust the top with 2 tablespoons cocoa powder.
Slice with a sharp knife. For clean cuts:
- run the knife under hot water,
- wipe it dry,
- then slice.
Repeat for each slice if you want café-style edges.
Tips that actually help (not the usual filler)
Don’t over-soak the biscuits
The milk is just there to start softening. The fridge does the rest. Over-dipping makes the base heavy and messy.
Keep the cream cold, always
If the cream is warm, it won’t whip properly and the filling can turn loose. Cold cream + quick mixing gives you a stable layer.
Mascarpone first, cream second
Mixing mascarpone with sugar first prevents lumps. Adding cream after helps it whip up evenly.
Want a stronger chocolate taste?
- Add 1–2 teaspoons cocoa powder into the filling (sift it in).
- Or use coffee instead of milk for dipping.
Want it sweeter?
Add 1 extra tablespoon powdered sugar to the filling (I wouldn’t go much beyond that—Nutella carries most of the sweetness).
Pan release tip
If you’re using a springform, run a thin knife around the edge before unlocking. If you’re using a regular pan, line it with baking paper strips that hang over the sides so you can lift it out.
Storage
- Keep it refrigerated, covered.
- Best texture is within 24–48 hours.
- After that it’s still good, but the biscuits keep softening and the slices won’t be as sharp.
Freezing isn’t my favorite for this one because the cream texture changes slightly after thawing, but it’s doable if needed—just thaw overnight in the fridge.

Nutella Cake (No-Bake Biscuit Cake)
Ingredients
For the biscuit layers
- 300 –400 g biscuits/cookies
- 150 ml hot milk or milk + coffee, or coffee
- Nutella enough to spread about 1 tsp per biscuit sandwich
- 2 tbsp cocoa powder for dusting
For the filling
- 300 ml cold whipping cream 35% fat
- 250 g mascarpone cheese
- 2 tbsp powdered sugar
Instructions
- Spread about 1 teaspoon Nutella on one biscuit and top with another biscuit to make a sandwich. Repeat to make enough sandwiches for two layers.
- Dip each sandwich very briefly in hot milk (quick in-and-out). Arrange in a 20 cm pan to form the first layer.
- Mix mascarpone and powdered sugar until smooth. Add cold whipping cream and whip until firm.
- Spread half of the filling over the first biscuit layer.
- Make a second layer of Nutella biscuit sandwiches, briefly dipped in milk, and place over the filling.
- Spread the remaining filling on top.
- Refrigerate for 3 hours. Dust with cocoa powder, slice, and serve.