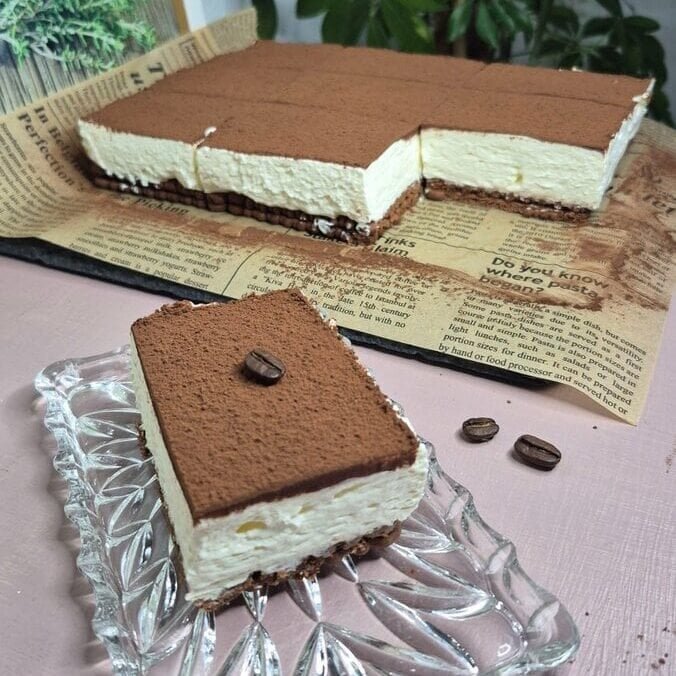
I love classic tiramisu, but I don’t always love the whole “separate eggs, worry about raw yolks, wait overnight” situation. This Nutella tiramisu is the shortcut version I started making on busy weeks, and it’s honestly the one my friends ask for most often now.
It’s built on cocoa biscuits that get a thin smear of Nutella, then they’re sandwiched, dipped quickly in warm milk (or milk + coffee), and covered with a mascarpone-cream layer that sets in the fridge. Two hours later you’ve got clean slices, a soft cookie layer, and that Nutella edge in every bite. It tastes like a cross between tiramisu and a chocolate-hazelnut icebox cake—without needing any baking skills or special tools.
Below is exactly how I make it, including the little details that matter (like how fast to dip the biscuits and how firm to whip the cream).
What this Nutella tiramisu is like
- Texture: soft, sliceable, creamy. The biscuits turn cake-like after chilling.
- Sweetness: moderate. Nutella is doing most of the work, so the filling only needs a little sugar.
- Time: about 20 minutes of hands-on work + 2 hours in the fridge.
- Equipment: mixing bowl, hand/stand mixer, spoon/knife for Nutella, and a 20×20 cm pan.
Ingredients (and why they’re in the recipe)
Base layer
70 g cocoa biscuits/cookies
These are your “ladyfingers” in this version. Cocoa biscuits give you a built-in chocolate flavor so you don’t have to add anything fancy. Use what you can find: cocoa tea biscuits, cocoa butter biscuits, or any crisp cocoa cookie that can handle a quick dip.
Nutella
You’ll spread 1 teaspoon per biscuit (for each “half” of the sandwich). This does two things: it adds the hazelnut flavor, and it creates a thin layer that stays noticeable even after chilling.
50 ml milk (or half milk, half coffee)
Warm liquid softens the biscuits fast. Milk makes it mild and kid-friendly. Doing half coffee gives you more “tiramisu vibes” without making it bitter. You don’t need much—just enough for quick dips.
My usual choice: 25 ml milk + 25 ml coffee, warm (not boiling).
Filling
250 ml heavy/whipping cream
This gives the filling its lightness and structure. If you whip it to the right stage before adding mascarpone, the filling ends up firm and sliceable.
250 g mascarpone
Mascarpone gives that classic tiramisu richness. Let it sit at room temperature for 10 minutes so it mixes smoothly.
2 tbsp powdered sugar
Just enough to sweeten and stabilize slightly. Powdered sugar blends quickly and doesn’t feel grainy.
Finish
Cocoa powder (about 1 tbsp for dusting)
This is the simplest finishing touch, and it balances the sweetness. Dust it right before serving if you want the cleanest look.
Before you start: a couple small things that help
- Warm the milk/coffee. If it’s cold, the biscuits won’t soften evenly and you’ll be tempted to soak them longer (which leads to mush).
- Have your pan ready. Once you start dipping biscuits, you want to place them right away.
- Don’t overthink the Nutella. A thin, even teaspoon per biscuit is plenty. Too much makes the layers slide around when slicing.
Step-by-step instructions (how I actually assemble it)
1) Make the Nutella biscuit sandwiches
Take one cocoa biscuit and spread 1 teaspoon of Nutella on it. Top with another biscuit to make a sandwich.
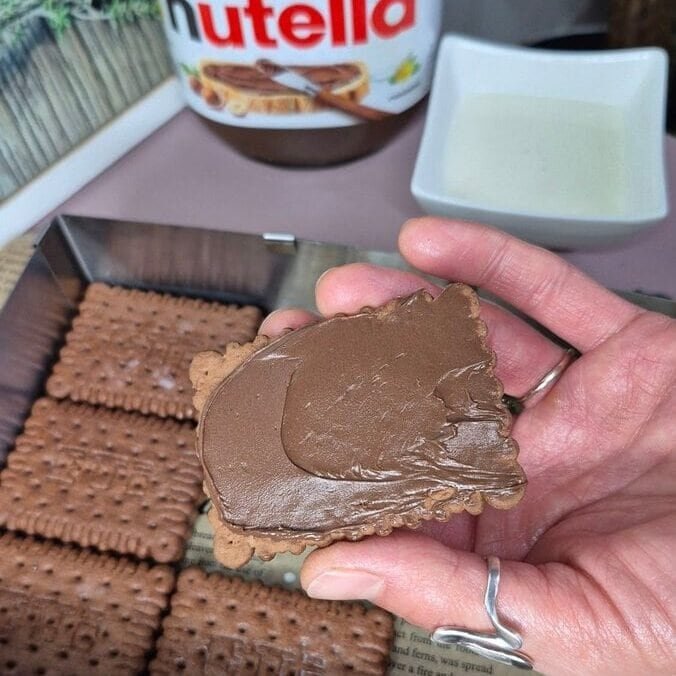
Keep going until you’ve used up your biscuits. I usually make a little stack of sandwiches first so the assembly goes quickly.
Tip: If your Nutella is stiff, microwave it for 5–8 seconds (just to loosen it). Not hot—just spreadable.
2) Dip quickly and build the base in the pan
Pour your warm milk (or milk + coffee) into a small bowl.
Dip each Nutella sandwich very briefly—think a quick in-and-out. You’re not trying to soak it like a sponge; you’re just giving the outside a soft start.
Arrange the dipped sandwiches in a 20×20 cm pan, snugly. If you have gaps, break a biscuit or two to fill the corners. A tight base helps the tiramisu slice neatly later.
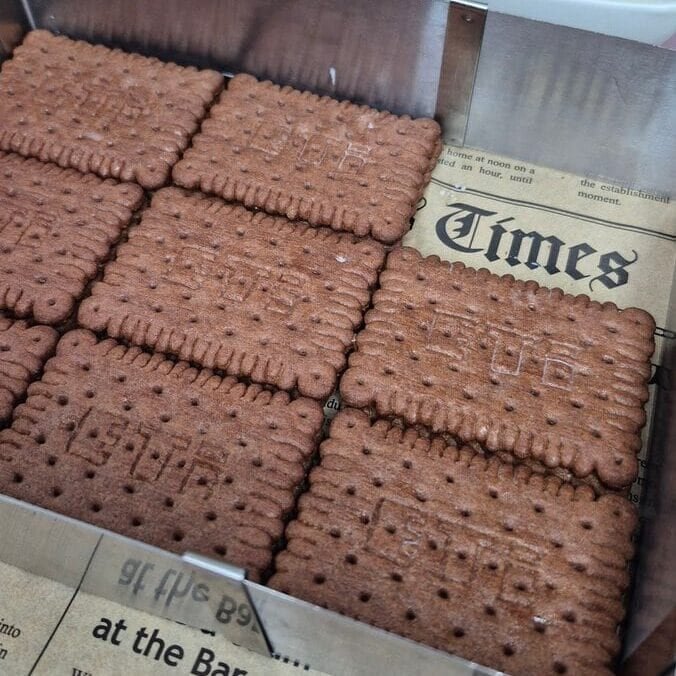
What “briefly” means in real life:
If the biscuit looks like it’s starting to darken and soften at the edges, that’s enough. If it’s bending in your fingers, you went too far (still edible, just softer).
3) Whip the cream, then add mascarpone + sugar
In a mixing bowl, whip the 250 ml heavy cream until it’s halfway thickened—soft peaks-ish. It should look creamy and hold a little shape, but not be stiff yet.
Add the mascarpone (250 g) and powdered sugar (2 tbsp).
Continue mixing until you get a firm cream. Stop once it’s thick and holds its shape. If you keep going long past that, it can turn grainy (mascarpone is a bit sensitive).
How I check it:
Lift the beaters—if the peak stands up and only slightly curls at the tip, you’re good.
4) Spread the filling and chill
Spoon the filling over the biscuit layer and spread it evenly to the edges.
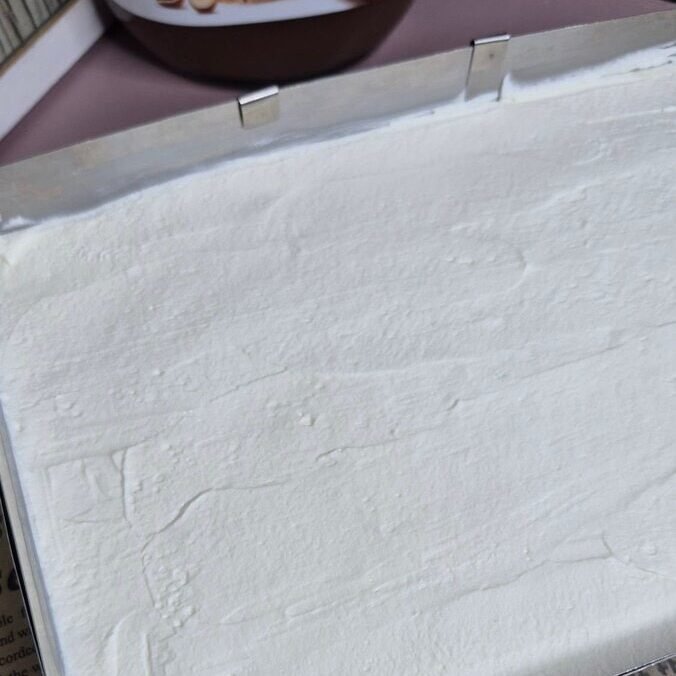
Cover and refrigerate for at least 2 hours. This is when everything sets: the biscuits soften into a cake-like layer and the filling firms up.
5) Cocoa dust + slice
Dust the top with about 1 tablespoon cocoa powder.
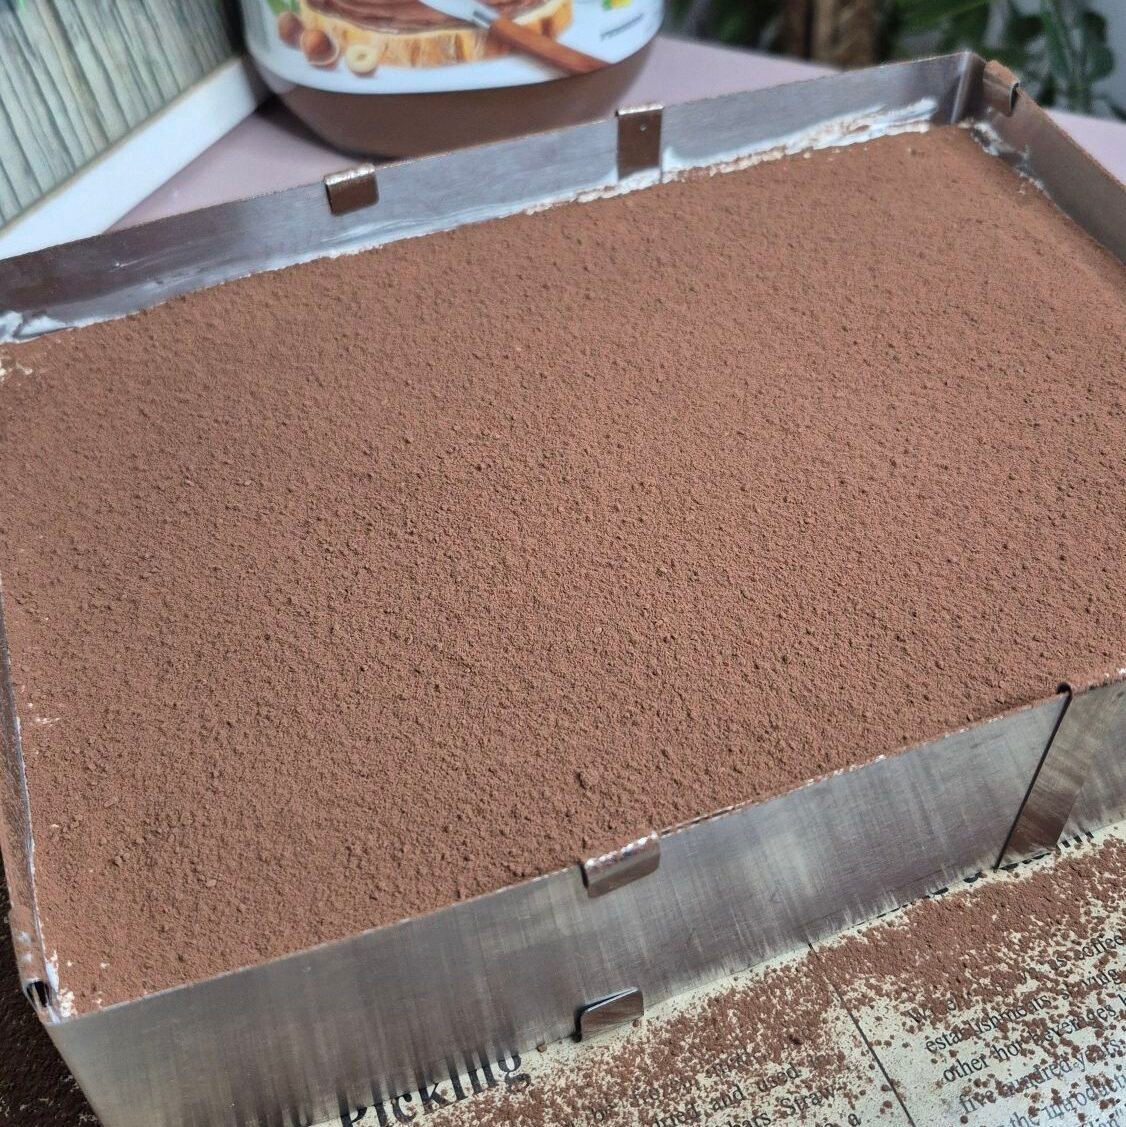
Slice into squares. For the cleanest cuts, wipe your knife between slices.
Tips that make it better (and less stressful)
Don’t soak the biscuits
This is the #1 thing that changes the final texture. A fast dip is enough because the filling will soften them further in the fridge.
Chill time matters
Two hours is the minimum where it starts cutting neatly. If you have longer (like 4–6 hours), it slices even cleaner and the flavor settles in more.
Want it more “tiramisu”?
Use half coffee in the dipping liquid. You can even add a tiny pinch of instant coffee to the milk if you don’t have brewed coffee around.
Want it more “Nutella-forward”?
Spread the Nutella slightly thicker than 1 teaspoon or add a few small spoonfuls of Nutella on top of the biscuit layer before the filling (little dots, then swirl gently). I do this when I’m serving it to serious Nutella fans.
Mascarpone mixing trick
If your mascarpone is very cold, it can clump. Let it sit out 10 minutes, and mix on medium speed—not the highest setting—once it’s added.
Serving and storage
- Serve straight from the fridge.
- Keeps well 2–3 days covered. The biscuit layer gets softer over time (still good, just more like a chilled cake).
Common questions
Can I make this in a different pan size?
Yes. A slightly larger pan will give you a thinner dessert. A smaller one makes it thicker. Keep the base layer snug, and you’ll be fine.
Can I freeze it?
You can, but the texture changes a little when thawed (the cream layer can weep slightly). I prefer fridge-only for the best slices.
What cocoa biscuits should I buy?
Anything crisp and cocoa-flavored works. If your biscuits are very thin and delicate, dip even faster.

Nutella Tiramisu (No-Bake) — 20×20 cm Pan
Ingredients
Base
- 70 g cocoa biscuits/cookies
- Nutella about 1 tsp per biscuit, for spreading
- 50 ml warm milk or half milk, half coffee
Filling
- 250 ml heavy/whipping cream
- 250 g mascarpone
- 2 tbsp powdered sugar
Finish
- 1 tbsp cocoa powder for dusting
Instructions
- Spread 1 teaspoon of Nutella on a cocoa biscuit and top with another biscuit to make a sandwich. Repeat with remaining biscuits.
- Warm the milk (or milk + coffee). Dip each sandwich briefly (quick in-and-out) and arrange tightly in a 20×20 cm pan.
- Whip the cream until halfway thickened. Add mascarpone and powdered sugar, then mix until the cream is firm and holds its shape.
- Spread the filling evenly over the biscuit layer. Cover and refrigerate for 2 hours.
- Dust with cocoa powder. Slice and serve.
Notes
- Don’t soak the biscuits—fast dips prevent a mushy base.
- For a stronger tiramisu feel, use half coffee in the dipping liquid.
- Best texture after 2–6 hours chilling.