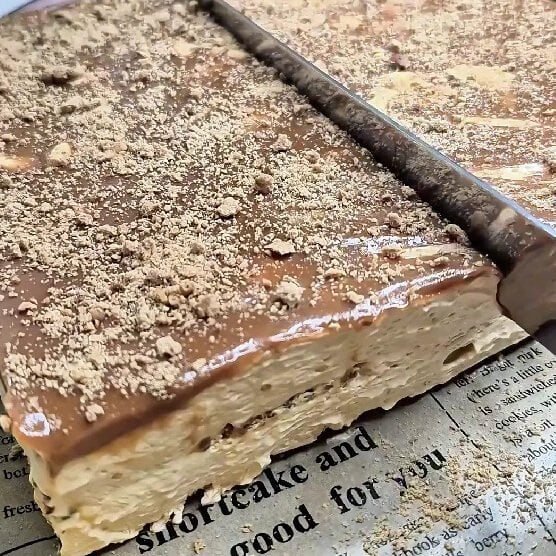
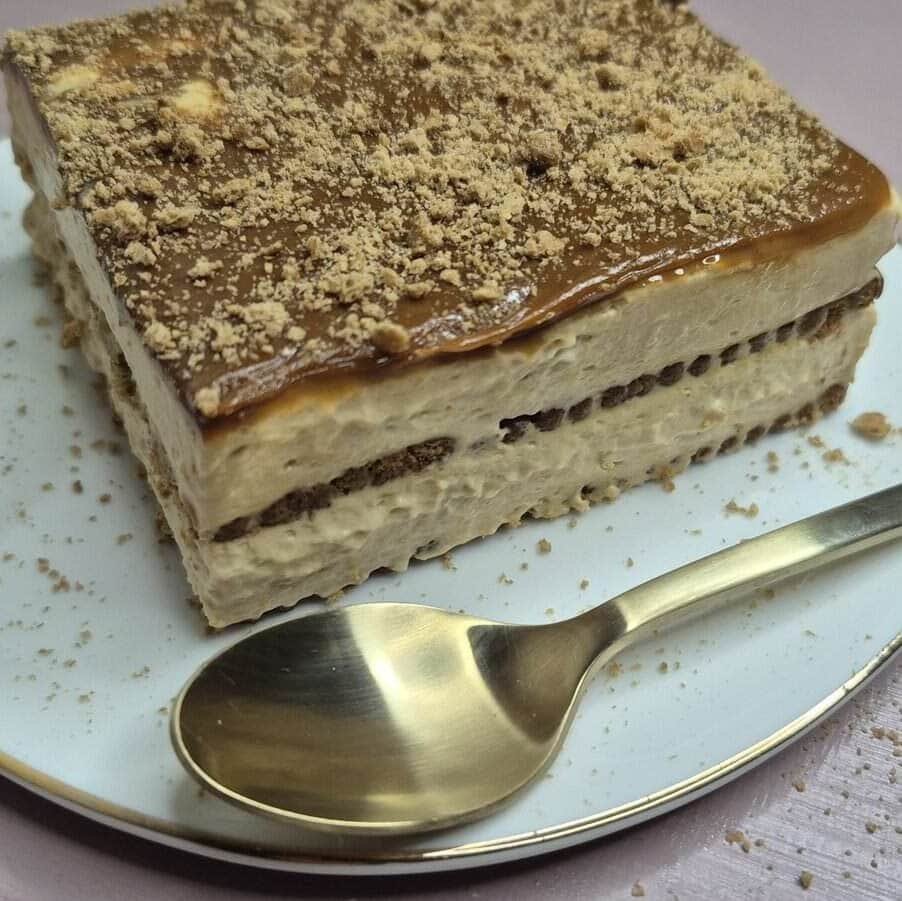
If you want a dessert that looks neat, slices well, and does not need the oven, this caramel biscuit cake is a solid one to keep on repeat.
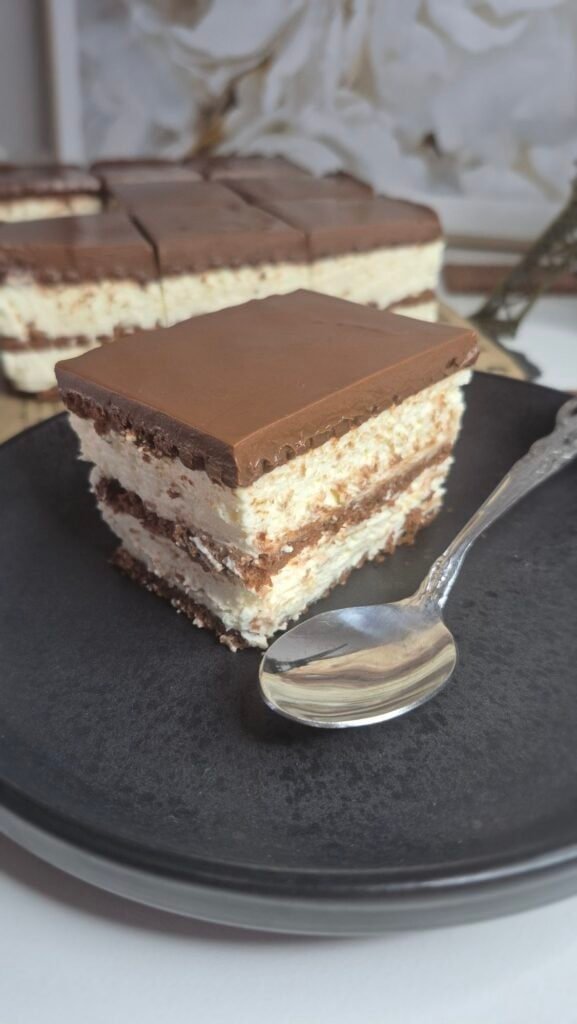
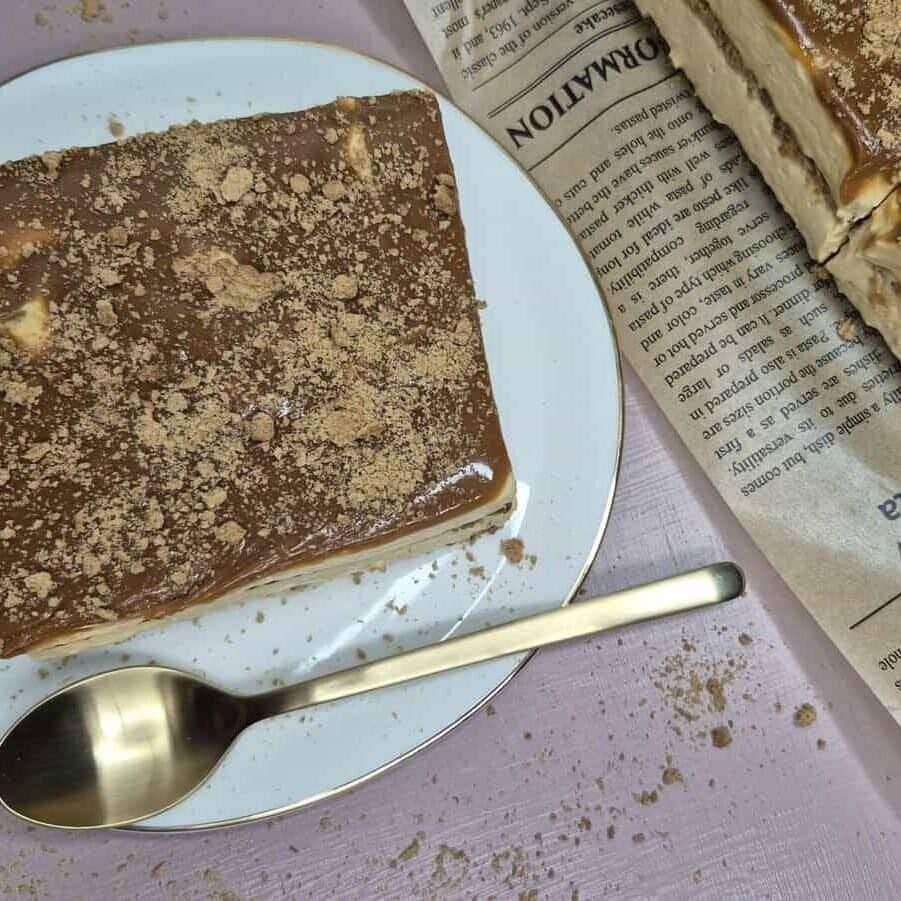
It is built in layers with dipped tea biscuits, a mascarpone and caramel cream filling, and a soft caramel topping that sets in the fridge. The texture is what makes it work so well. The biscuits soften just enough, the filling stays light but stable, and the caramel on top gives the whole cake a clean finish without making it too heavy.
I make this when I want something simple that still feels like a proper cake once sliced. It is also easy to prep ahead, which helps a lot when I do not want last-minute dessert work.
Why this caramel biscuit cake works
This recipe is straightforward, but a few small things make a big difference.
The biscuits are dipped briefly, not soaked, so they soften in the fridge without turning mushy.
The filling uses mascarpone and whipped cream together, which gives a texture that is creamy but still holds its shape.
The caramel is added both inside the filling and on top, so the flavour comes through in every layer instead of sitting only on the surface.
It also slices better after chilling than many quick fridge desserts, which makes it useful if you want something that looks tidy on a plate.
What this cake tastes like
This is not the kind of caramel dessert that hits you with too much sweetness right away.
The mascarpone keeps the filling balanced, and the biscuits break up the richness. If you use coffee for dipping, the cake gets a slight contrast that works really well with the caramel. If you use milk, the flavour stays softer and more family-friendly.
The end result is creamy, lightly caramel-flavoured, and easy to eat straight from the fridge.
Ingredient breakdown
Biscuits
I use petit biscuits or plain tea biscuits for the layers.
They are ideal here because they soften nicely after chilling and create that classic sliceable fridge cake texture. Any simple plain biscuit in that style works, as long as it is not filled or heavily flavoured.
Coffee or milk
This is for dipping the biscuits.
Coffee gives the cake a slightly deeper flavour and cuts through the sweetness a bit. Milk keeps it milder. Both work, so I choose based on who I am serving.
The key is to dip quickly. A long soak will make the biscuit layers too wet.
Mascarpone
Mascarpone gives the filling body and a smooth texture.
It also helps the cake set properly in the fridge. I like using it here because it makes the filling feel more like a cake layer and less like a loose mousse.
Whipping cream
Cold whipping cream is important for getting a firm, airy filling.
Once whipped, it lightens the mascarpone mixture and stops the cake from feeling dense. I always start with very cold cream because it whips faster and holds better.
Powdered sugar
Only a small amount is needed.
Caramel cream already brings sweetness, so the sugar here is more about rounding out the filling than making it sweet on its own.
Caramel cream
This is the main flavour in the filling and the topping.
I use it in two ways. First, it goes into the whipped cream mixture for a caramel flavour throughout the filling. Then I warm a little extra for the topping so the finished cake has that glossy top layer.
If the caramel cream is thick, a little milk helps loosen it for spreading.
Optional decorations
I usually keep the top simple, but there are a few easy options.
Crushed biscuits add texture.
Whipped cream swirls make it look more finished if you are serving guests.
Extra caramel drizzle works when you want a more obvious caramel look.
A few caramel bits or a little chocolate shaving can also work, as long as you do not overload the top.
How to make caramel biscuit cake
1. Build the first biscuit layer
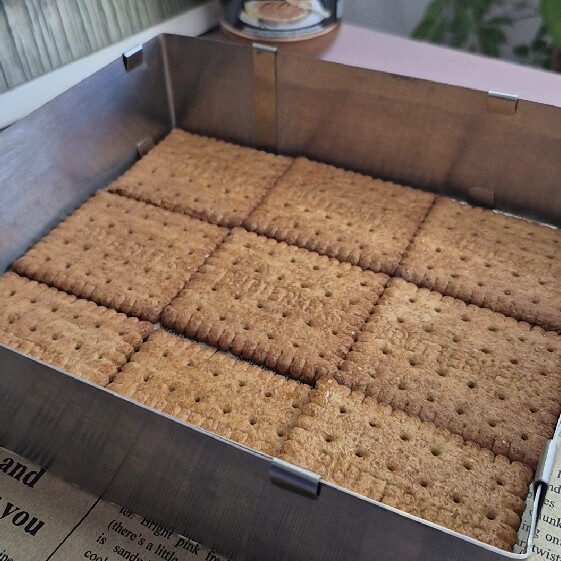
Start by dipping the biscuits one at a time in coffee or milk.
Be quick here. You want them lightly moistened, not soaked through.
Arrange them in a single layer in the bottom of your pan or dish. Fill the base as evenly as you can so the first layer is flat and stable.
If you need to break a biscuit to fit the corners, that is completely fine.
2. Make the mascarpone mixture
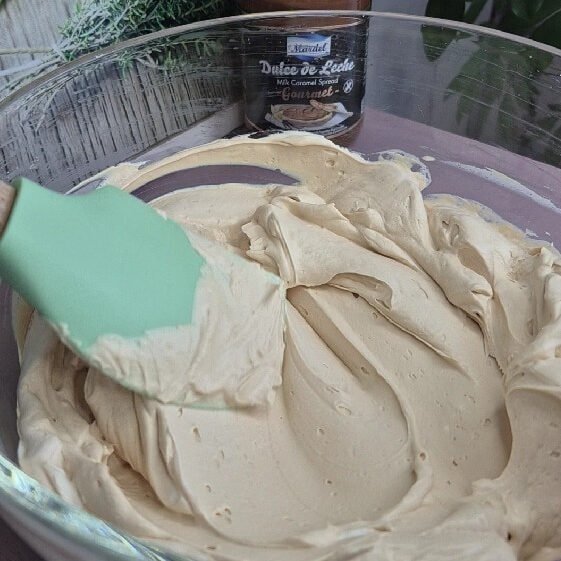
In one bowl, mix the mascarpone with the powdered sugar until smooth.
Do not overmix it. You just want a creamy base with no lumps.
This step is simple, but it helps to make sure the mascarpone is smooth before adding the whipped cream later.
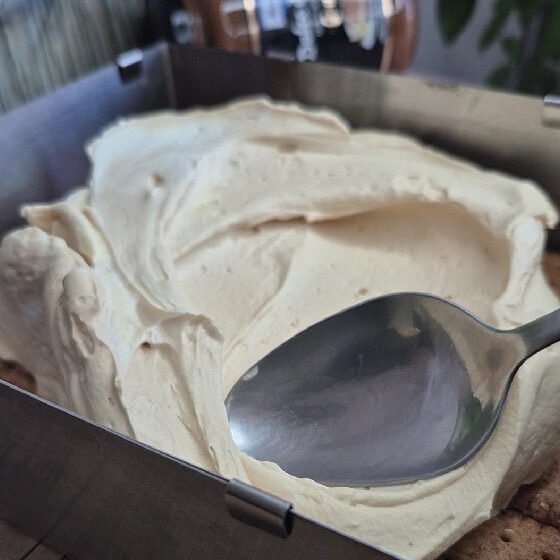
3. Whip the cream with caramel
In a second bowl, whip the cold cream with the caramel cream until firm peaks form.
The mixture should hold its shape well enough to fold into the mascarpone without going runny.
This is one of the parts that sets the final texture of the cake, so I stop as soon as the cream is firm. Overwhipping makes it harder to fold smoothly.
4. Fold the filling together
Add the whipped cream mixture into the mascarpone mixture.
Use a spatula and fold gently until the filling is evenly combined. Try not to stir aggressively, because that knocks air out of the cream and makes the filling heavier.
Once mixed, divide the filling into two equal parts.
Keeping the layers even makes the finished cake look much better once sliced.
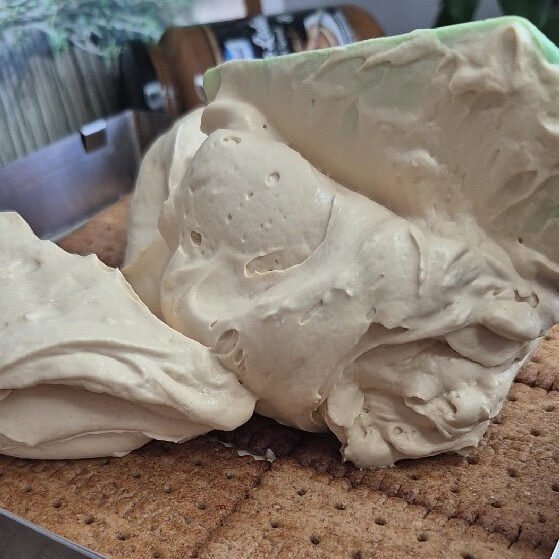
5. Spread the first cream layer
Take half of the filling and spread it over the biscuit base.
Use a spatula to push it into the corners and smooth the surface. It does not have to be perfect, but an even layer helps keep the next biscuit layer stable.
6. Add the second biscuit layer
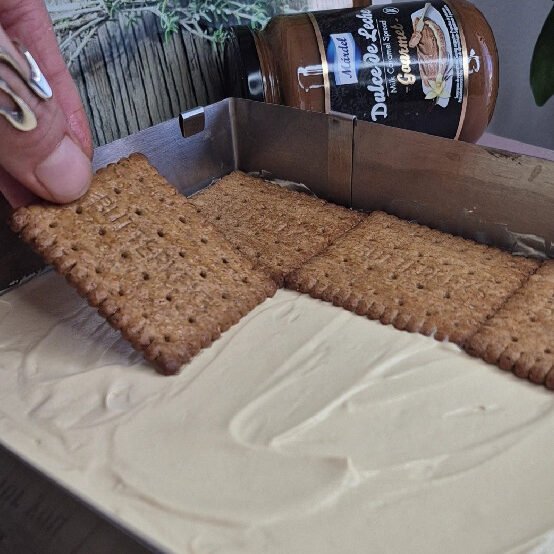
Dip the remaining biscuits briefly, just like before.
Lay them over the cream layer in an even layer. Try to line them up neatly, because it makes spreading the final cream layer easier.
At this stage, the cake already starts to hold its structure.
7. Finish with the second cream layer
Spread the rest of the filling over the second biscuit layer.
Smooth the top well, cover the dish, and place it in the fridge until the filling firms up.
This chill time matters. It gives the biscuits time to soften and the filling time to set so the cake slices cleanly later.
8. Make the caramel topping
Once the cake is chilled, gently warm the caramel cream until smooth and pourable.
Use very low heat or warm it over steam. If it feels too thick, add a little milk to loosen it.
Let it cool slightly before pouring it over the cake. It should be warm enough to spread, but not hot, otherwise it can soften the cream layer underneath.
Pour it on top and spread gently if needed.
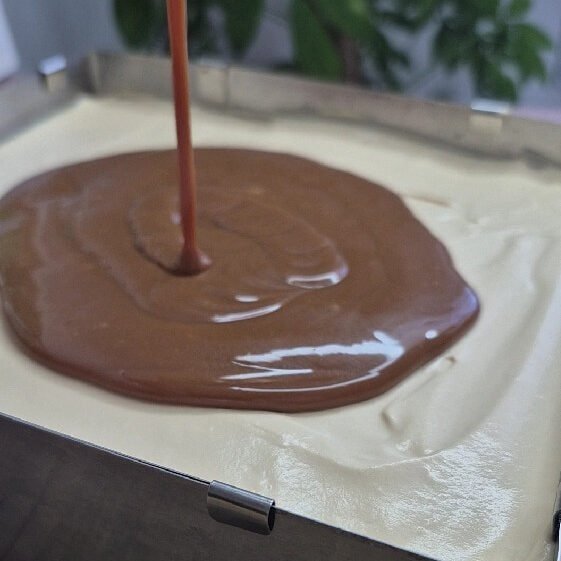
Then return the cake to the fridge so the topping can set properly.
9. Decorate and serve
Before serving, decorate the top however you like.
A light scatter of crushed biscuits is often enough.
If I want a slightly more finished look, I add a few whipped cream swirls and a thin drizzle of extra caramel. I keep it restrained so the top still looks clean and the slices stay easy to cut.
Serve the cake cold.
Tips that help
Dip the biscuits quickly
This is the main thing to get right.
A quick dip gives you soft layers after chilling. A long dip gives you a wet base and messy slices.
Use cold cream
Cold cream whips faster and holds better.
If the cream is not cold enough, the filling can turn loose and the cake will need longer to set.
Do not rush the chilling time
The cake needs time in the fridge to come together.
Right after assembling, it is still too soft. After chilling, the layers settle and the biscuits soften into that cake-like texture.
Warm the caramel gently
Hot caramel topping can damage the cream layer.
I always let it cool a little before pouring it on. Warm and fluid is perfect. Hot is not.
Keep the decoration light
This cake looks best when the top is not overloaded.
A simple finish also makes it easier to slice without dragging toppings across the surface.
Easy variations
You can adjust this recipe without changing the method too much.
Use coffee for a slightly deeper flavour, or milk for a softer version.
Add a little chocolate shaving on top if you want a caramel-chocolate finish.
Use a pinch of sea salt in the caramel topping if you want a subtle salted caramel feel.
You can also make it a day ahead, which is often even better because the layers settle more fully overnight.
How to store it
Keep the cake covered in the fridge.
It is best served cold, and the texture stays nicest that way. I find it holds well for a couple of days, which makes it useful for making ahead.
If you decorate with whipped cream swirls, they are best added closer to serving so they keep their shape.
Serving ideas
This cake is rich enough to serve in smaller slices.
I like it plain, straight from the fridge, but it also works with coffee if you used coffee in the biscuit layers. That little link between the cake and what you serve with it works well.
It is a good dessert for casual family meals, but it also looks tidy enough for birthdays, dinner guests, or a weekend dessert table.
Final thoughts
What I like most about this caramel biscuit cake is that it does not ask for much, but it still gives a proper finished result.
There is no baking, no complicated technique, and no long ingredient list. It is just a few familiar ingredients layered in the right order, with enough chill time to let everything come together.
Once sliced, it has that nice contrast of soft biscuit layers, smooth caramel mascarpone filling, and a simple caramel top that makes it look finished without extra work.

Caramel Biscuit Cake with Mascarpone
Ingredients
For the base
- 150 g petit biscuits or similar tea biscuits
- 100 ml coffee or milk for dipping
For the filling
- 250 ml cold whipping cream
- 250 g mascarpone
- 1 tablespoon powdered sugar
- 2 tablespoons caramel cream
For the topping
- 3 tablespoons caramel cream
- 1 –2 tablespoons milk only if needed to thin it
Optional decoration
- Crushed biscuits
- Caramel bits or candies
- Whipped cream swirls
- Extra caramel drizzle
- A little chocolate shaving
Instructions
- Briefly dip each biscuit in coffee or milk. Do not soak them.
- Arrange the dipped biscuits in a single layer over the bottom of the pan until fully covered.
- In one bowl, mix the mascarpone and powdered sugar until smooth and creamy.
- In a second bowl, whip the cold whipping cream with 2 tablespoons caramel cream until firm peaks form.
- Using a spatula, gently fold the whipped cream mixture into the mascarpone mixture until evenly combined.
- Divide the filling into 2 equal parts.
- Spread half of the filling evenly over the biscuit base and smooth the top.
- Dip the remaining biscuits briefly in coffee or milk and arrange them over the first cream layer in an even layer.
- Spread the remaining filling over the second biscuit layer and smooth the top evenly.
- Cover and refrigerate for 2 to 3 hours so the cake can set.
- Gently warm the 3 tablespoons caramel cream over steam or on very low heat.
- Add 1 to 2 tablespoons milk only if needed, until the caramel becomes pourable and smooth.
- Let it cool slightly so it is warm, not hot.
- Pour it over the chilled cake and spread gently if needed.
- Return the cake to the fridge for 1 more hour to set the topping.
- Decorate as desired with crushed biscuits, whipped cream, extra caramel, caramel bits, or a little chocolate shaving.
- Slice and serve chilled.
Notes
- Dip the biscuits very quickly so they soften without turning soggy.
- Use cold whipping cream for the best texture in the filling.
- Let the caramel topping cool slightly before pouring it over the cake so it does not melt the cream layer.
- This cake can be made a day ahead and kept covered in the fridge until serving.
- Coffee gives a slightly deeper flavour, while milk keeps the cake softer and milder.