An irresistible fusion of rich chocolate, creamy Nutella, and the iconic caramelized magic of Lotus Biscoff!
If there’s one dessert that can instantly turn an ordinary day into a cozy, sweet-filled celebration, it’s this No-Bake Lotus Biscoff Chocolate Dream Cake. I’m not exaggerating when I say that this recipe became one of my all-time favorites from the moment I tried it.
It’s simple.
It’s fast.
It’s luxurious.
It tastes like something you’d get in a boutique pastry shop—yet it’s made with only a handful of ingredients, no oven, and barely any effort.
In this post, I’ll take you through every detail of the recipe: texture, flavor, the fun little moments while preparing it, how to serve it beautifully, tips for storage, and even how to modify it for different preferences. And yes… expect a lot of chocolatey enthusiasm and Biscoff happiness along the way.
So grab your ingredients, get comfy, and let’s dive straight into this gorgeous dessert that melts hearts with every slice.
Why This No-Bake Lotus Cake Is Pure Magic
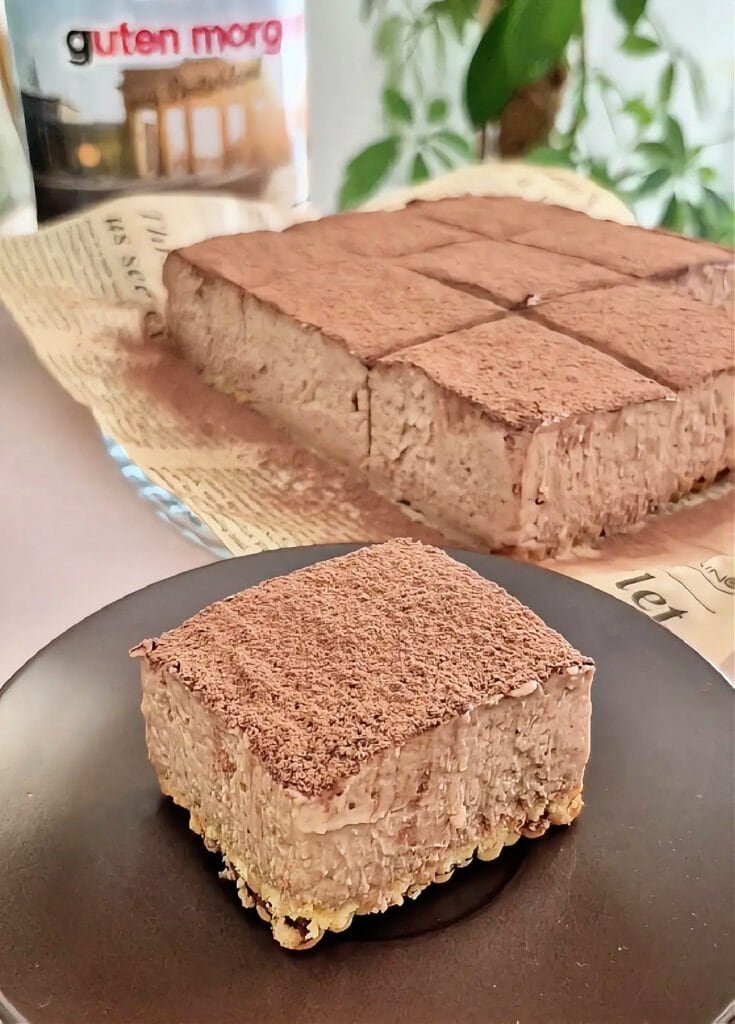
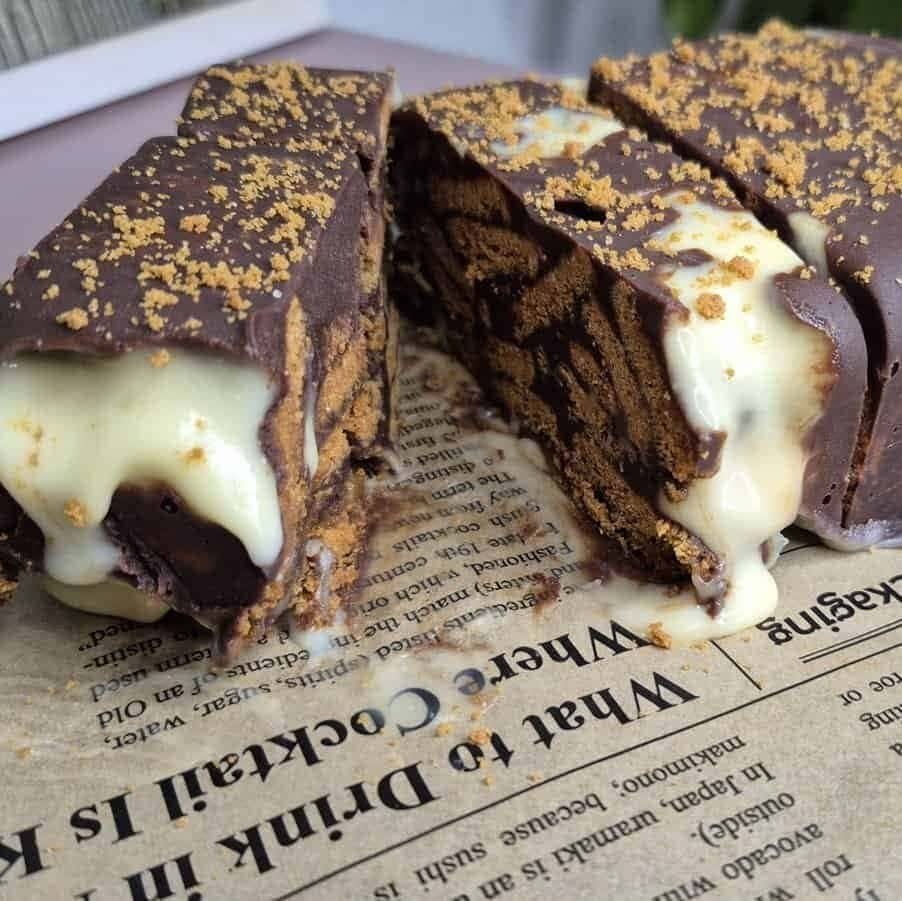
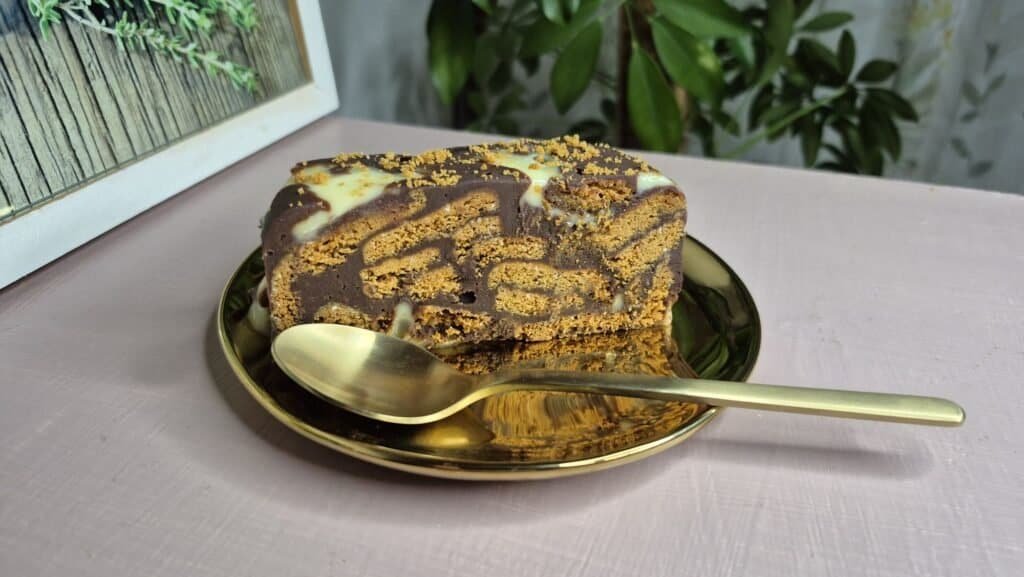
Before we get into the mixing and melting, I want to share why I adore this dessert so much. Every bite feels like a perfect balance between crunchy, creamy, silky, and sweet textures. The moment you cut through it, you notice:
The crumbly Lotus base, still chunky enough to keep every piece interesting.
A glossy chocolate-Nutella mixture, smooth, comforting, and deep in flavor.
A delicate drizzle of white chocolate, adding elegance and sweetness.
That irresistible fragrance—warm caramel, cocoa, and a hint of hazelnut.
Honestly, it’s one of those cakes that make people think you spent hours making it… when in reality, the freezer does most of the work.
Ingredients You’ll Need
Here’s the complete list of ingredients :
- 150 g Lotus Biscoff cookies
- 100 g dark chocolate
- 20 g butter
- 30 ml milk
- 2 tablespoons Nutella
- 50 g white chocolate
That’s all! Just six ingredients—and every single one of them contributes beautifully to the final result.
Step-by-Step Procedure (With Extra Tips!)
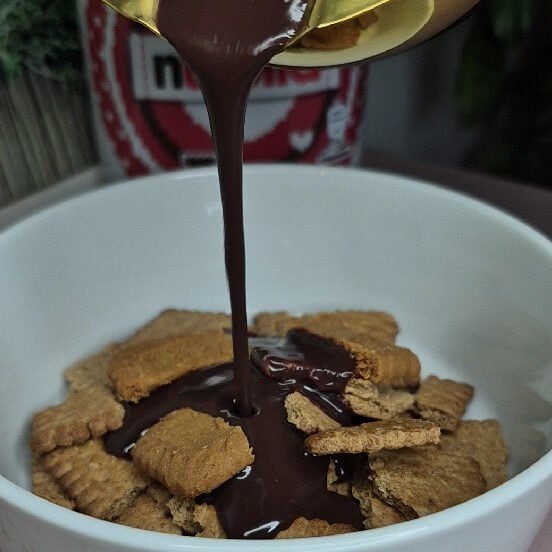
Break the Lotus cookies — but keep them chunky!
One of my favorite parts of this recipe is crushing the Lotus Biscoff cookies by hand. Not into crumbs—into big, uneven chunks.
Those golden pieces soak up the chocolate mixture later and give the cake its signature bite.
The more irregular the pieces, the more beautiful the final texture.
So don’t be shy: break them boldly!
Melt the dark chocolate, milk, and butter together
You’ll use steam (the classic bain-marie or “melting over steam”) to gently melt the mixture.
Watching chocolate soften and swirl with butter is pure therapy.
Once everything is smooth, add the magic ingredient:
Nutella
Stir gently until it melts into the chocolate.
If the mixture seems too thick (this can happen depending on the chocolate brand), add a splash more milk—just enough to make it pourable, but still rich and glossy.
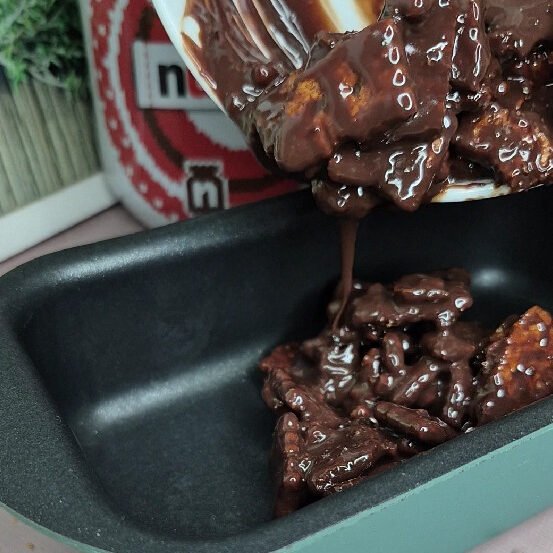
Pour the chocolate mixture over the broken cookies
Now comes the transformation moment!
As soon as the warm chocolate mixture hits the cookie pieces, the aroma becomes incredible.
Mix everything until each piece is coated.
You’ll notice the texture starts to resemble a chunky, sticky, chocolatey mosaic—that’s exactly what you want.
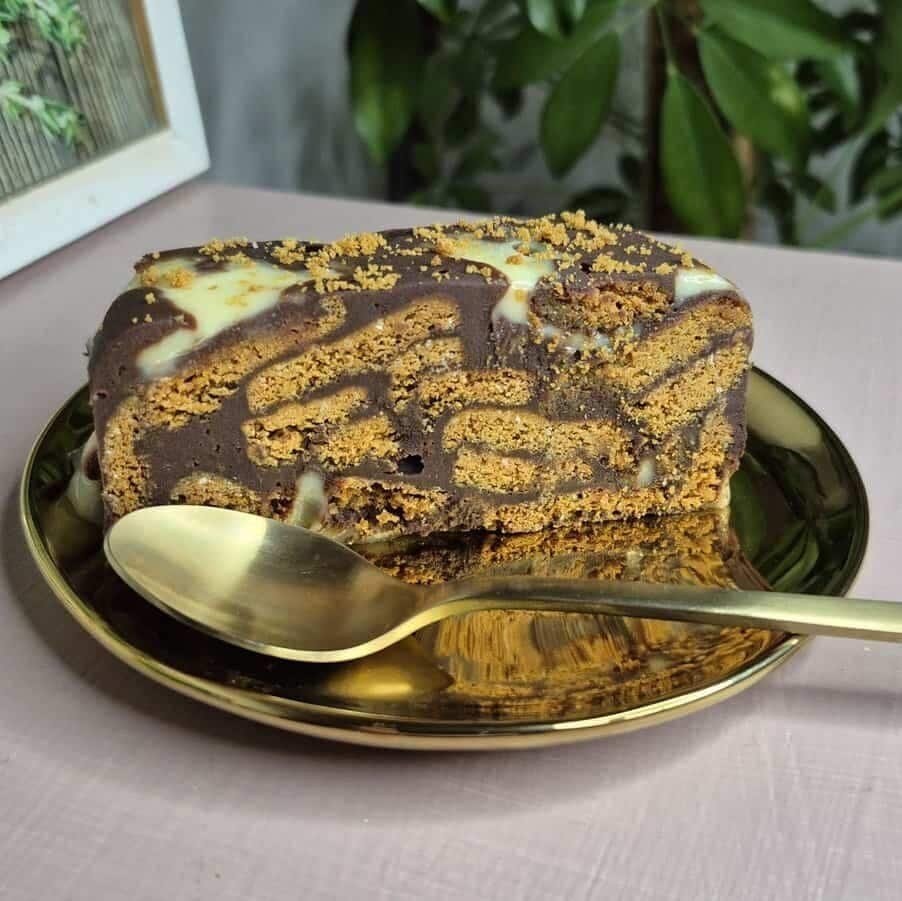
Spread into an 18×10 cm pan
This size is perfect: not too big, giving your cake the ideal height and density.
Tip:
Line the pan with plastic wrap (or baking paper) so you can remove the cake easily later.
Trust me—future you will appreciate this step.
Press the mixture into the pan gently with a spatula or your fingers. It doesn’t have to be perfectly smooth; a bit of texture makes it look rustic and charming.
Melt the white chocolate and create a beautiful drizzle
Once the white chocolate is melted over steam, drizzle it over the top of the cake in any pattern you like:
- Zig-zags
- Waves
- Thick lines
- Thin lines
- Crosshatch
- Swirls
Whatever you do, it will look gorgeous because the contrast between dark and white chocolate is naturally stunning.
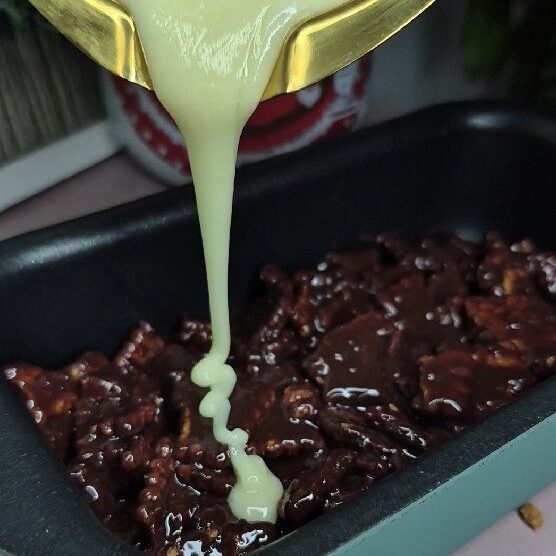
Chill for 3–4 hours
This part requires patience… but the reward is worth every minute!
Put the pan in the fridge and let the cake firm up.
During this time, the chocolate will set, the flavors will deepen, and the Lotus cookies will blend beautifully with the creamy filling.
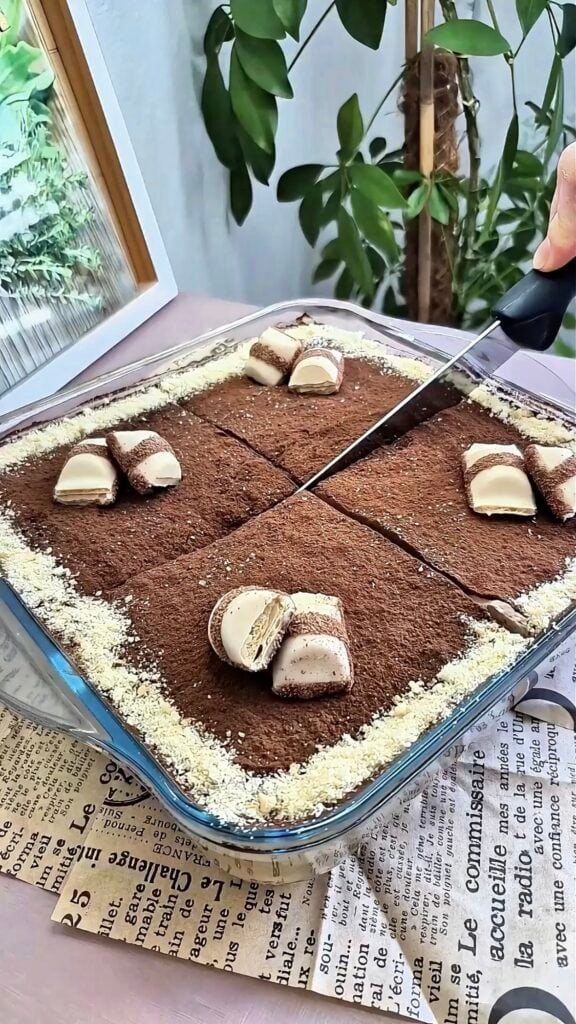
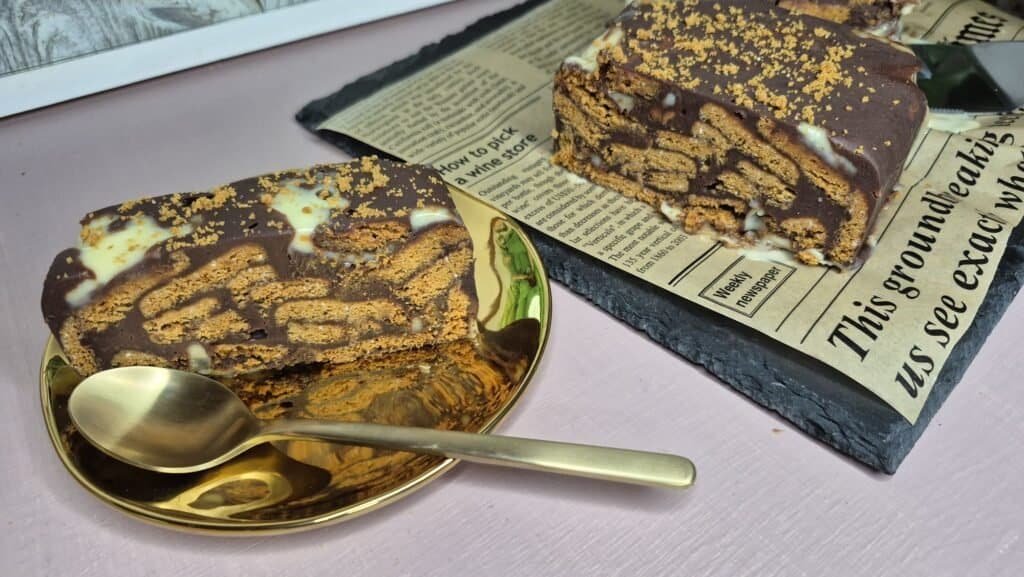
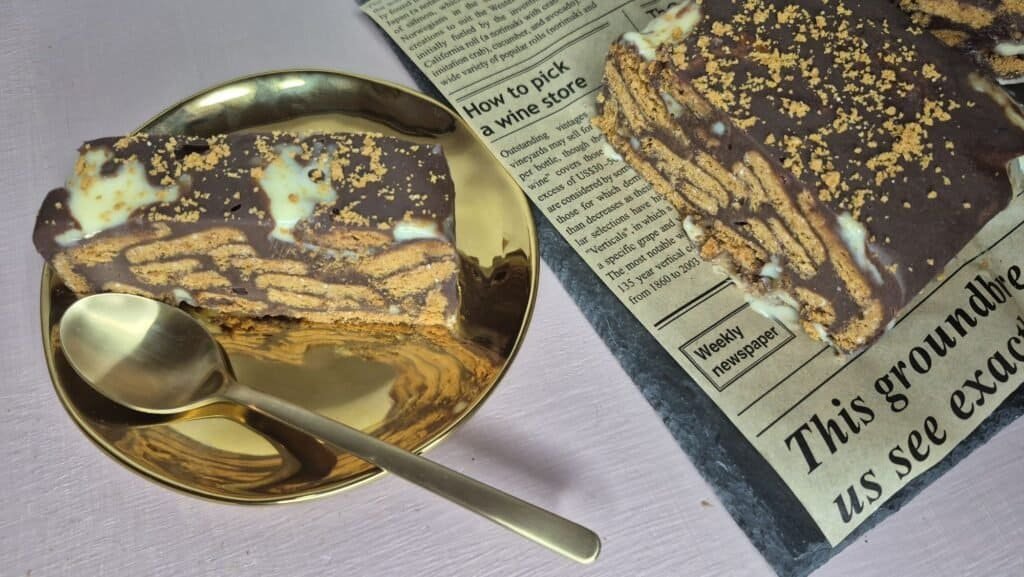
Decorate and slice
Once chilled, lift the cake out using the plastic wrap.
If you want to add a finishing touch, sprinkle some crushed Lotus Biscoff on top.
It gives the cake an elegant look and an extra pop of flavor.
Slice into squares, bars, or thin rectangles—each piece is rich enough that even small servings feel satisfying.
The Flavor Experience
Now let’s talk about what this cake actually tastes like, because this is where it becomes unforgettable.
Lotus Biscoff
Deep caramel flavor, slightly spiced, sweet but not overpowering.
It gives structure to the cake and creates irresistible pockets of crunch.
Dark chocolate
Adds richness and depth.
Balances the sweetness from the Lotus and Nutella.
Nutella
Brings creaminess and a subtle hazelnut note that ties everything together.
White chocolate
The finishing touch—sweet, smooth, visually beautiful, and a perfect complement to the darker base.
The harmony of flavors is extraordinary.
Nothing competes—each part enhances the other.
Tips for Best Results
1. Use quality chocolate
Since the cake has no baking process to develop flavor, using good chocolate makes a huge difference.
2. Don’t crush cookies too finely
You want a lovely chunky texture.
3. Chill fully—don’t rush it
3–4 hours is ideal. For even firmer bars, leave overnight.
4. Experiment with toppings
Crushed Lotus is classic, but you can also add:
roasted hazelnuts
cocoa nibs
a drizzle of melted Biscoff spread
5. Use a sharp knife for slicing
Dip it in warm water first for clean edges.
How to Serve
This cake is surprisingly versatile. You can serve it:
- With a cup of coffee
- As a cold dessert after lunch
- As giftable dessert bars wrapped individually
- On a dessert platter with fruits and whipped cream
- At parties (because these slices disappear fast!)
It pairs especially well with fresh berries, because the tartness balances the sweetness perfectly.
Storage Tips
One of the best things about this dessert is how well it stores.
In the fridge:
Lasts 5–7 days sealed in an airtight container.
In the freezer:
You can freeze it for up to 2 months.
Slice first, freeze the pieces, and thaw only the amount you need.
Perfect for dessert emergencies.
Variations You Can Try
Once you fall in love with this recipe (and you will), try playing with variations!
Extra chocolate layer
Pour melted dark chocolate over the top before adding the white chocolate.
Nutty version
Add roasted hazelnuts or almonds to the cookie mixture.
Biscoff-only
Replace Nutella with melted Biscoff spread for a super caramelized version.
Ice-cream cake twist
Mix the cookie mixture into vanilla ice cream, freeze, and drizzle with white chocolate.
Fruity contrast
Serve with strawberries or raspberries for a refreshing twist.
Endless possibilities—and every one of them delicious.
Final Thoughts
This No-Bake Lotus Biscoff Chocolate Cake is one of those rare desserts that checks every box:
Quick
Simple
Affordable
No oven
Perfect texture
Stunning presentation
Rich, smooth, and unforgettable
And the best part?
It feels like a luxurious treat even though the process is unbelievably easy.
If you’re looking for a dessert that makes people go “WOW” with minimal effort, this is it. Whether you’re preparing it for yourself, your family, or a special occasion, it never disappoints.
So go ahead—grab your Lotus cookies, melt that chocolate, and enjoy every sweet, crunchy, creamy bite.