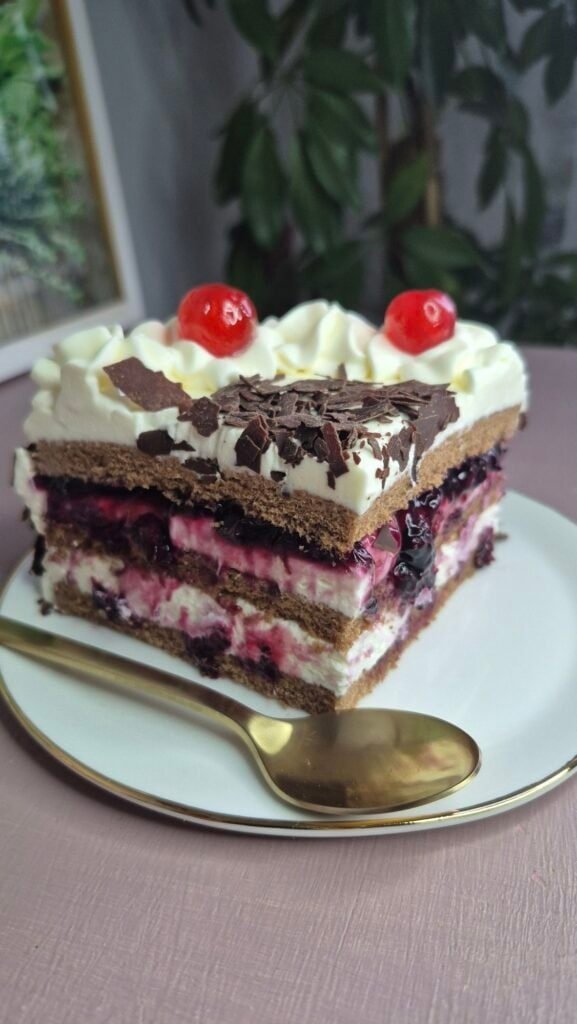
This cake is built in simple layers, but it looks like much more effort than it really is.
It starts with a light sponge, gets filled with a Nutella mascarpone cream, then finished with a smooth chocolate ganache on top. The milk keeps the sponge soft, the filling stays creamy without being too heavy, and the ganache pulls everything together.
I’ve made this cake enough times to know exactly where it can go wrong and what makes it turn out well. So instead of padding this with filler, I’m going straight into the parts that actually help.
Why this cake works
The sponge is light and flexible, which matters because it has to hold a rich filling without feeling dense.
The filling is one of the easiest parts of the whole recipe. Mascarpone gives it body, Nutella brings the flavor, and whipped cream keeps it from turning stiff or overly thick.
The milk soak does more than people think. It softens the sponge and gives the finished cake that sliceable, creamy texture after chilling.
Then the ganache adds a clean finish. It sets just enough in the fridge so the top looks neat when sliced, but it still stays soft enough to cut without cracking.
This is the kind of cake that tastes better after resting, which makes it especially useful when I want to prepare dessert ahead of time.

What the cake tastes like
The sponge itself is light and not too sweet.
The filling is creamy, chocolate-hazelnut forward, and balanced by the mascarpone so it doesn’t taste like straight chocolate spread.
The ganache gives the top a deeper chocolate flavor, which helps stop the whole cake from tasting flat or one-note.
If I add Kinder chocolates, chopped hazelnuts, or chocolate curls on top, they bring texture and make the cake look finished without much extra work.
Ingredient breakdown
Eggs
The sponge relies on separated eggs, and that step matters here.
The yolks bring richness to the batter, while the whipped whites give the cake lift. That’s why the sponge stays airy even without a lot of flour.
Sugar
Sugar sweetens the sponge, but it also helps the yolks whip up pale and creamy. That part gives the batter a better structure before the egg whites are folded in.
Flour and baking powder
The flour keeps the sponge stable enough to slice.
The small amount of baking powder gives extra support, but most of the light texture comes from the whipped egg whites rather than chemical leavening.
Oil
A little oil keeps the sponge from drying out too quickly.
It’s not enough to make the cake heavy, but it does improve the texture.
Mascarpone
Mascarpone is what gives the filling its thick, smooth texture.
I use it cold so it stays firm and mixes cleanly with the Nutella.
Powdered sugar
Powdered sugar blends into the filling more smoothly than granulated sugar.
It sweetens the cream without leaving any graininess.
Nutella
This is the main flavor in the filling, so it’s worth using enough for a real chocolate-hazelnut taste.
It also helps thicken the mixture.
Heavy cream
Heavy cream shows up twice in this cake.
First, it gets whipped and folded into the filling to lighten it.
Then it’s heated for the ganache to melt the chocolate into a glossy topping.
Milk
The milk is there to soak the sponge layers.
That step keeps the cake soft after chilling and helps the layers sit together properly.
Chocolate
For the ganache, I prefer a chocolate that melts smoothly and tastes good on its own.
Since the ganache is only two ingredients, the flavor of the chocolate really comes through.

A few notes before starting
Use a clean bowl for the egg whites. Even a little grease can stop them from whipping properly.
Let the sponge cool completely before slicing. If it’s still warm, the filling will slide and the layers won’t stay neat.
Keep the mascarpone cold until you need it. Warm mascarpone gets loose fast.
Chill the assembled cake before adding the ganache. A cold cake makes the topping set more cleanly on the surface instead of running everywhere.
Step-by-step instructions
1. Make the sponge cake
Start by heating the oven and lining your cake pan with parchment paper.
Separate the eggs carefully, keeping the whites free from any yolk. I always do this one egg at a time into a small bowl first, just in case one breaks badly.
Whisk the yolks with the sugar until the mixture turns pale and creamy. Don’t rush this part. It should look thicker and lighter than when you started.
Add the flour, baking powder, and oil, then mix just until combined. At this stage the batter will seem thicker, and that’s normal.
In a separate clean bowl, beat the egg whites until stiff peaks form. They should hold their shape but still look smooth, not dry.
Fold the egg whites into the yolk mixture gently. I do this in parts rather than all at once. The goal is to keep as much air in the batter as possible.
Pour the batter into the prepared pan and smooth the top lightly.
Bake until the sponge is lightly golden and springs back when touched. Don’t overbake it. A dry sponge won’t improve later, even with the milk soak.
Once baked, let it cool completely.
When it’s fully cool, slice it into two even layers. A serrated knife works best here. I usually turn the cake slowly as I cut rather than forcing the knife straight across.
2. Make the Nutella mascarpone filling

Add the mascarpone, powdered sugar, and Nutella to a bowl.
Beat just until smooth. Don’t keep mixing longer than needed. Mascarpone can loosen if it’s overworked.
In a separate bowl, whip the cream until firm peaks form.
Fold the whipped cream gently into the Nutella mascarpone mixture. You want the filling to stay airy, not flat.

Once combined, divide the filling into two equal parts. One part goes between the layers, and the second goes on top.
The filling should be smooth, thick, and easy to spread. If it feels very soft, place it in the fridge for a short time before assembling the cake.
3. Assemble the cake
Place the first sponge layer on your serving plate or cake board.

Brush it with half of the milk. I use a pastry brush and go all the way to the edges so the layer softens evenly.
Spread over the first half of the filling.

Place the second sponge layer on top and brush it with the remaining milk.
Spread the rest of the filling over the top. You can leave the sides plain or tidy them slightly if some filling reaches the edges, but this cake works well as a simple top-finished cake too.
Once assembled, chill it well. This step is important because it firms up the filling and gives the layers time to settle before the ganache goes on.
4. Make the ganache
Chop the chocolate into small pieces and place it in a bowl.
Heat the cream until it’s just about to boil. It should be hot enough to melt the chocolate fully, but I don’t let it boil hard.
Pour the hot cream over the chocolate and leave it alone for a minute.
Then stir until smooth and glossy.
Let it cool briefly so it thickens a little. If you pour it while it’s too hot and thin, it can melt the top layer of filling. If you wait too long, it can get too thick to pour neatly. The best texture is fluid but not runny.
5. Finish the cake
Pour the ganache over the chilled cake and spread it gently if needed.

You can keep it plain, or decorate with Kinder chocolates, chocolate curls, or chopped hazelnuts.
Then chill the cake again until the ganache is set and the layers are fully firm.
For the cleanest slices, I like to cut it straight from the fridge with a warm knife, wiping the blade between cuts.
Tips that help
Don’t overmix the mascarpone.
That’s the fastest way to turn a thick filling into a loose one.
Don’t skip the milk soak.
The sponge is light, and the soak helps it settle into the creamy texture this cake is supposed to have after chilling.
Don’t rush the chilling time.
This cake is much better once it has had time to firm up. Right after assembly it can look fine, but after a proper chill it slices better and tastes more balanced.
Use a sharp serrated knife to split the sponge.
A regular straight-edged knife can press the cake down too much.
Let the ganache cool slightly before pouring.
That one small step keeps the top neat and stops the cream layer underneath from softening too much.
Decoration ideas
If I want a cleaner look, I leave the cake with just the ganache on top.
If I want it to look more finished for guests, I add a ring of chopped hazelnuts around the edge, or place small pieces of Kinder chocolate on top before the ganache fully sets.
Chocolate curls also work well because they add texture without making the cake harder to slice.
How to store it
This cake needs to be kept in the fridge because of the mascarpone and cream.
Once chilled, it holds well for a couple of days and often tastes even better the next day.
I keep it covered so the top stays glossy and the sponge doesn’t dry out.
Final note
This is one of those cakes that doesn’t need complicated decoration or extra layers to work.
The sponge is soft, the filling has enough structure to hold, and the ganache gives it a proper finish. It looks good once sliced, and the flavor is familiar in the best way.
It’s also a practical cake. You can make it ahead, chill it overnight, and serve it the next day without doing anything extra.

Baked Nutella Sponge Cake
Ingredients
For the Sponge Cake
- 6 eggs separated
- 8 tbsp sugar
- 7 tbsp all-purpose flour
- 1 tsp baking powder
- 2 tbsp oil
For the Nutella Cream Filling
- 500 g mascarpone cheese
- 60 g powdered sugar
- 5 heaping tbsp Nutella
- 100 ml heavy cream
For Soaking
- 120 ml milk
For the Ganache
- 150 g chocolate chopped
- 150 ml heavy cream
Optional Decoration
- Kinder chocolates
- Chocolate curls
- Chopped hazelnuts
Instructions
Make the sponge cake
- Preheat the oven to 180°C / 350°F.
- Line a 20 cm cake pan with parchment paper.
- Separate the eggs into yolks and whites.
- In a bowl, whisk the egg yolks with the sugar until pale and creamy.
- Add the flour, baking powder, and oil. Mix until combined.
- In a clean bowl, beat the egg whites until stiff peaks form.
- Gently fold the egg whites into the yolk mixture.
- Pour the batter into the prepared pan and smooth the top.
- Bake for about 10 minutes, or until lightly golden and springy to the touch.
- Let the sponge cool completely, then slice it into 2 even layers.
Make the filling
- In a bowl, combine the mascarpone, powdered sugar, and Nutella.
- Beat briefly until smooth.
- In another bowl, whip the heavy cream to firm peaks.
- Fold the whipped cream gently into the Nutella mixture.
- Divide the filling into 2 equal portions.
Assemble the cake
- Place the first cake layer on a serving plate.
- Brush with 60 ml milk.
- Spread over half of the filling.
- Add the second cake layer and brush with the remaining 60 ml milk.
- Spread the rest of the filling on top.
- Refrigerate for at least 2 hours.
Make the ganache
- Place the chopped chocolate in a bowl.
- Heat the heavy cream until just beginning to boil.
- Pour the hot cream over the chocolate and let sit for 1 minute.
- Stir until smooth and glossy.
- Let the ganache cool for 5 to 10 minutes, until slightly thickened but still pourable.
Finish the cake
- Pour the ganache over the chilled cake.
- Decorate with Kinder chocolates, chocolate curls, or chopped hazelnuts if using.
- Chill for another 1 to 2 hours, or overnight, before serving.
Notes
- Keep the mascarpone cold so the filling stays thick and smooth.
- Do not overmix the filling once the mascarpone is added.
- Let the sponge cool completely before slicing and assembling.
- This cake slices best after a full chill.
- Store covered in the refrigerator.