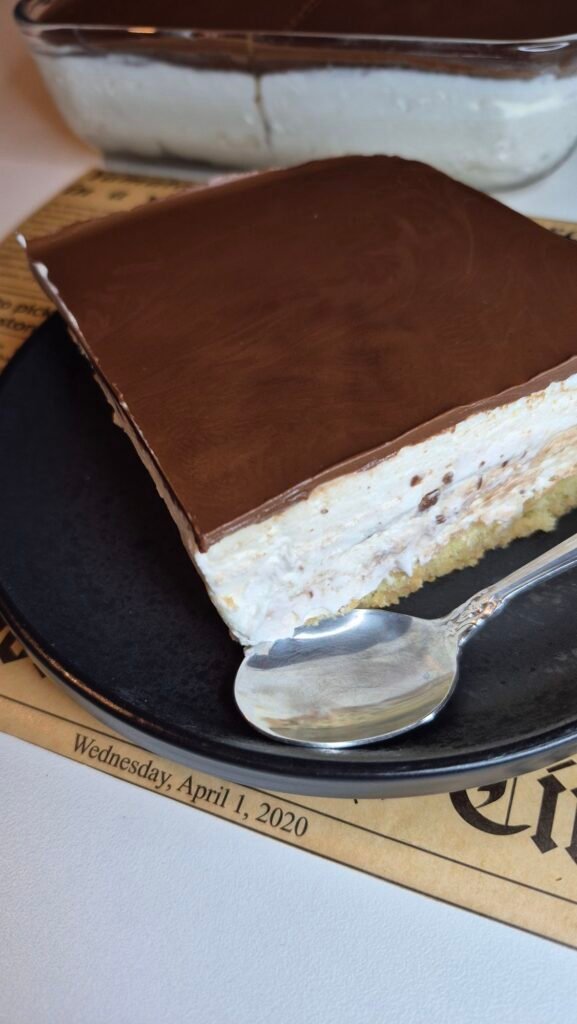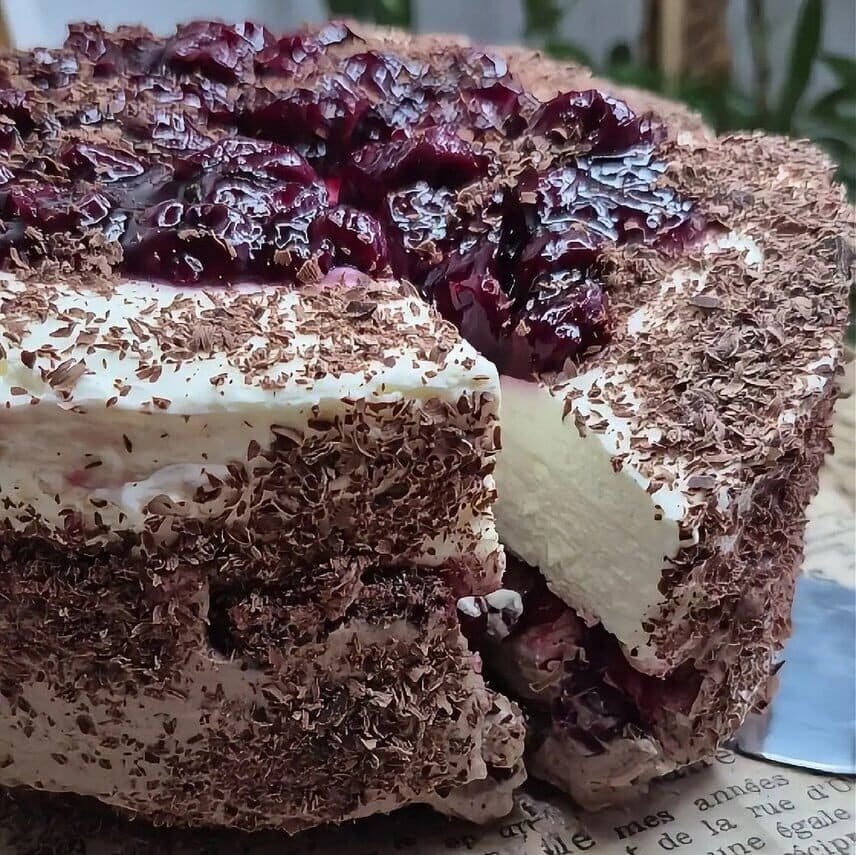
A good Black Forest dessert does not need to be complicated. This version skips the sponge layers and oven, but it still gives you the combination people actually come for: chocolate, cherries, cream, and a cold slice that cuts cleanly.
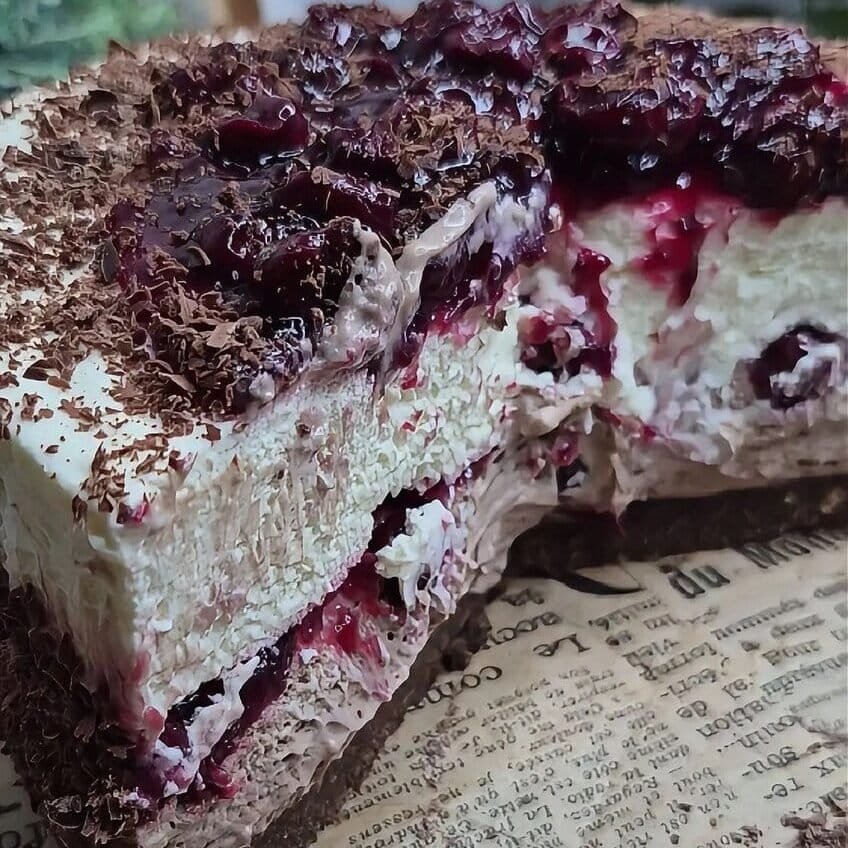
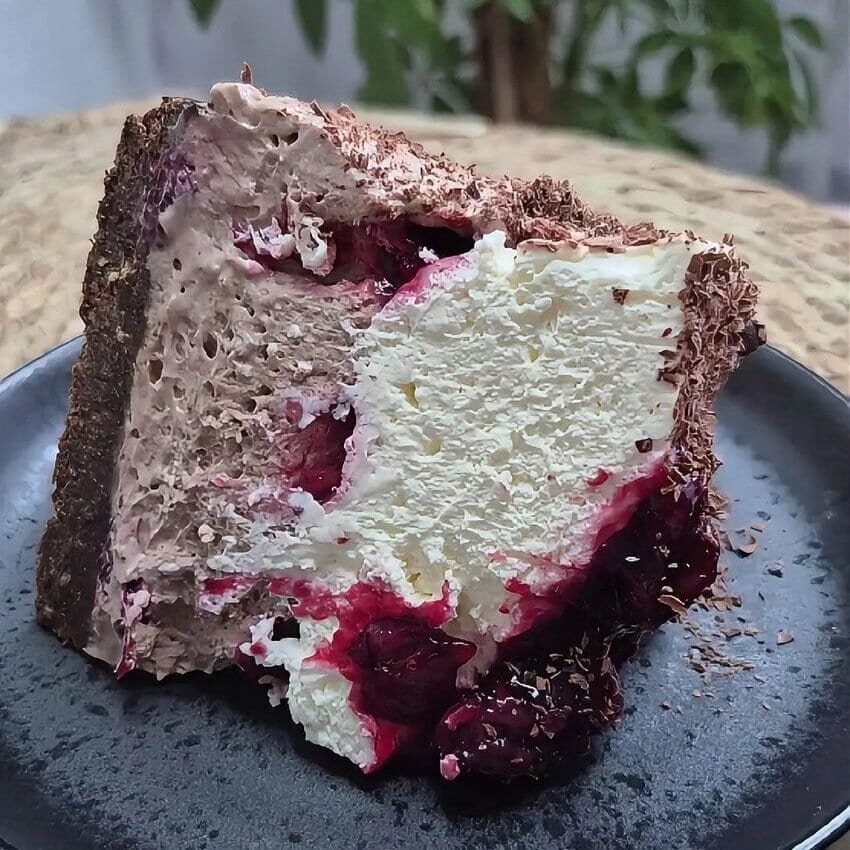
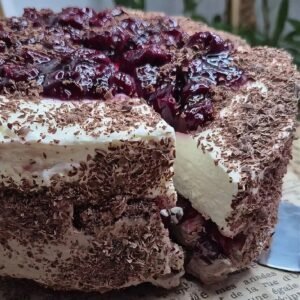
What I like about this cake is the balance. The base is firm and chocolatey without being too thick. The filling is rich but not heavy because the mascarpone is folded with whipped cream. The cherry layer breaks up the sweetness and keeps the whole cake from tasting flat. The grated chocolate on top finishes it properly and gives it that classic Black Forest look.
This is not a traditional German Black Forest gateau with chocolate sponge and kirsch. It is a no-bake Black Forest-style cake, and I think that matters because it sets expectations the right way. You get the same flavour direction, but in an easier format that fits a chilled dessert better.
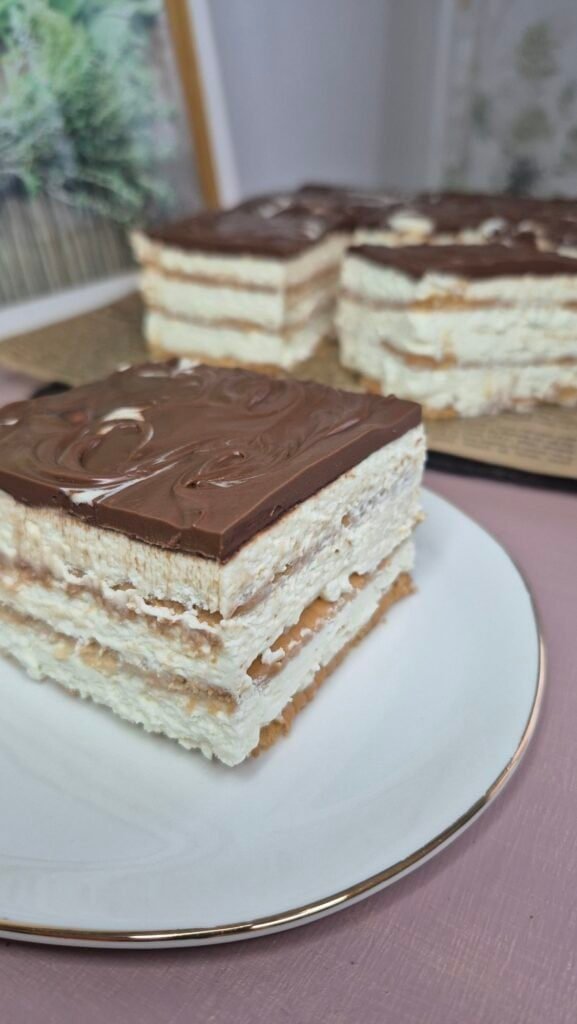
It also holds well in the fridge, which makes it a strong make-ahead option. Once it is fully set, all the layers stay defined and the slices look neat without much effort.
What makes this Black Forest cake work
The chocolate base gives the cake structure.
Because it is made with cocoa biscuits, melted butter and a little milk, it is easy to press into the pan and it firms up quickly in the fridge. It does not crumble the way some biscuit bases do when they are too dry.
The cream filling has two parts.
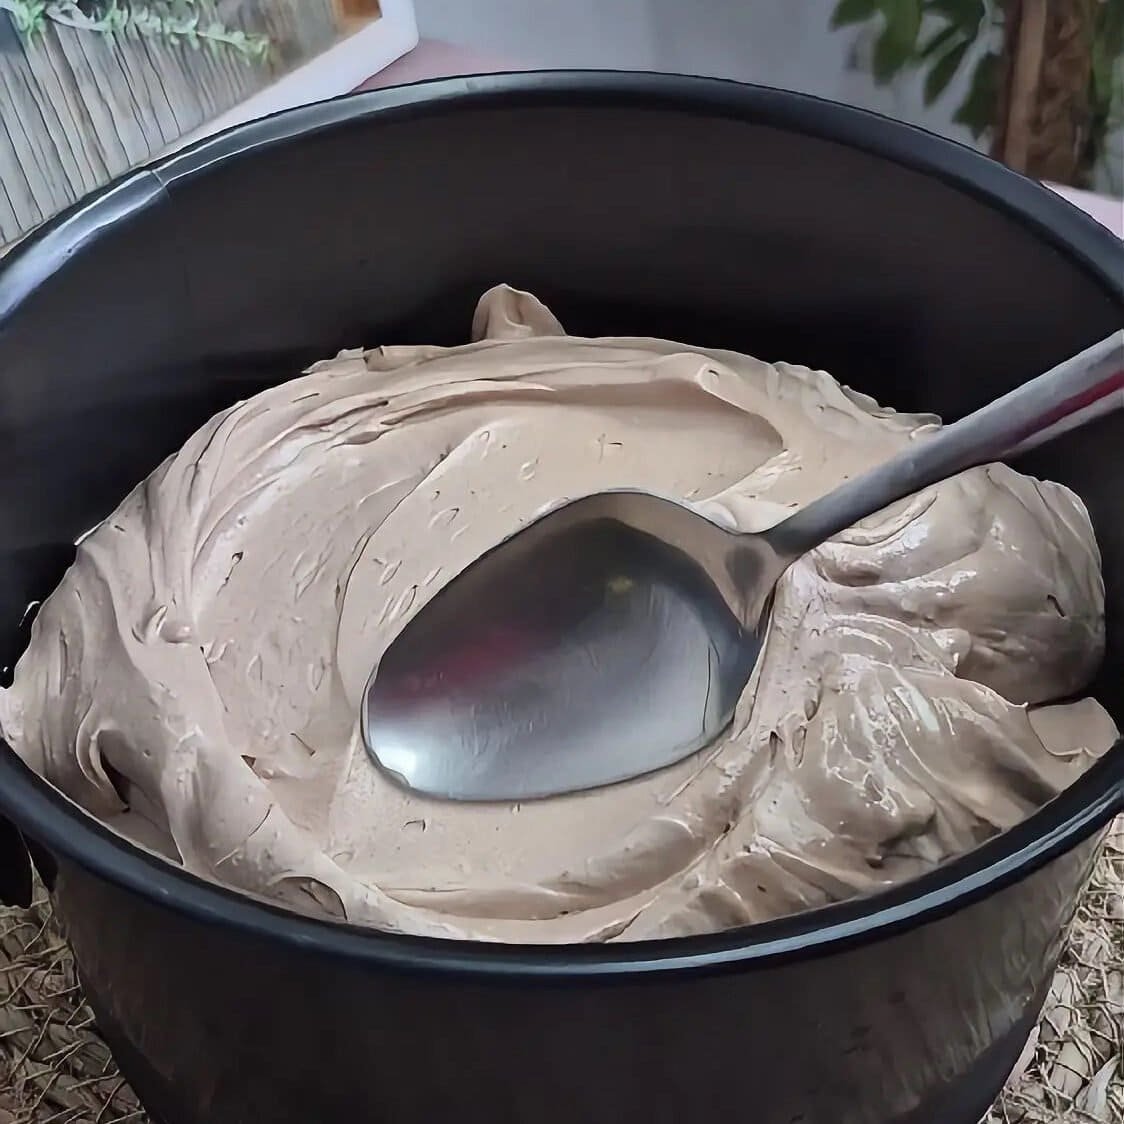
One part stays plain, with mascarpone and whipped cream, and the other gets mixed with Nutella. That gives the cake more depth than a single cream layer. You get a darker, more chocolate-hazelnut base layer and a lighter cream layer on top.
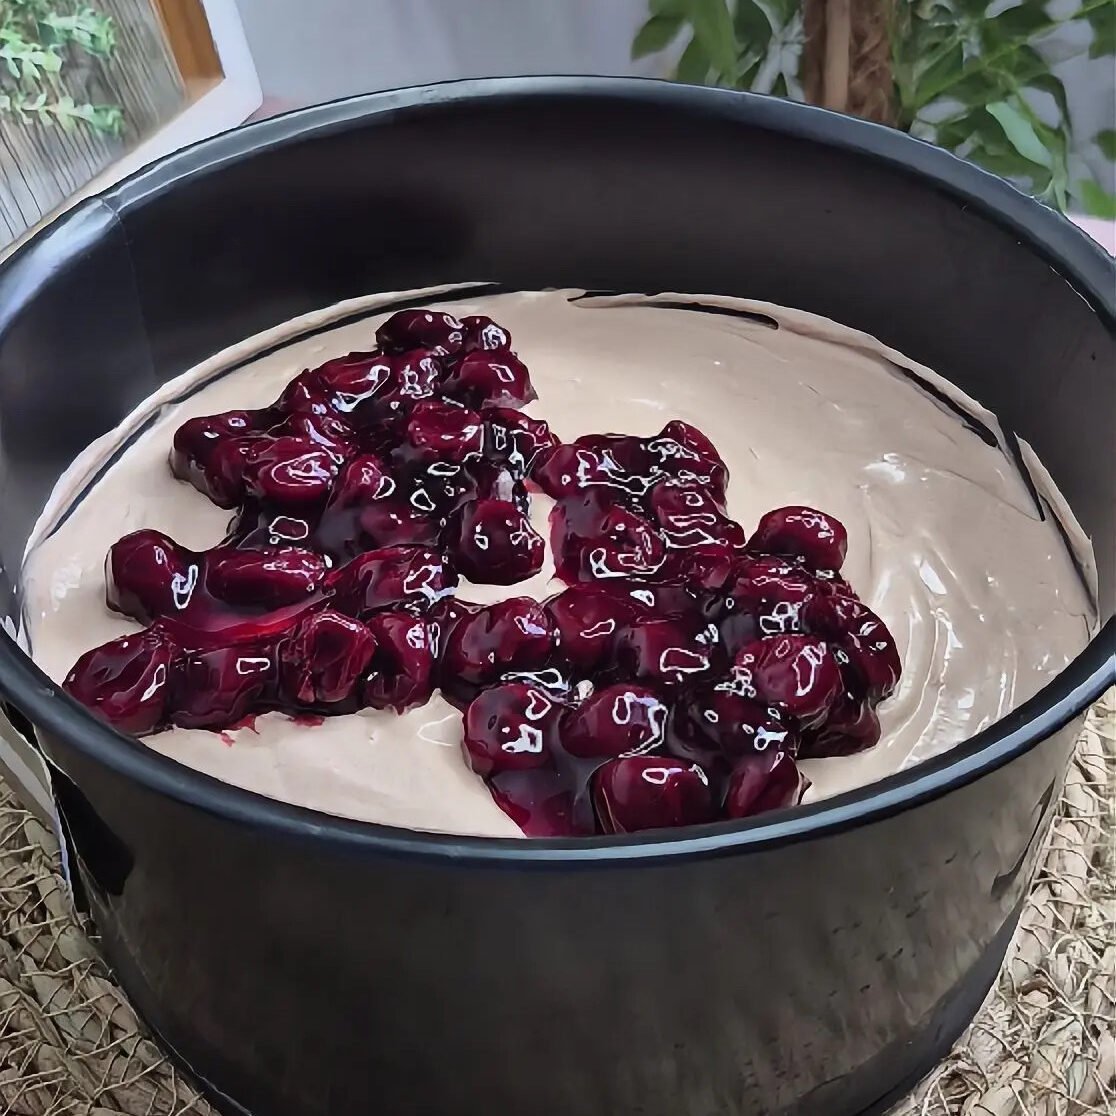
The cherry layer is simple but important.
It is not just fruit spooned over the cream. The cherries are cooked lightly with sugar, then thickened so they stay in place. That means you get distinct layers instead of juice running into the cream.
Then the shaved chocolate on top does the final job.
It adds texture, a bit of bitterness, and the look people expect from a Black Forest cake.
Ingredient breakdown
For the chocolate base
Cocoa biscuits form the entire base, so crush them finely. You want a texture closer to sand than rough crumbs. If the crumbs are too coarse, the base will not press down evenly and may crack when sliced.
Butter binds the crumbs together and helps the base firm up once chilled.
Milk softens the mixture slightly and makes it easier to press into a smooth layer. That small addition helps a lot, especially if the biscuits are on the drier side.
For the cream filling
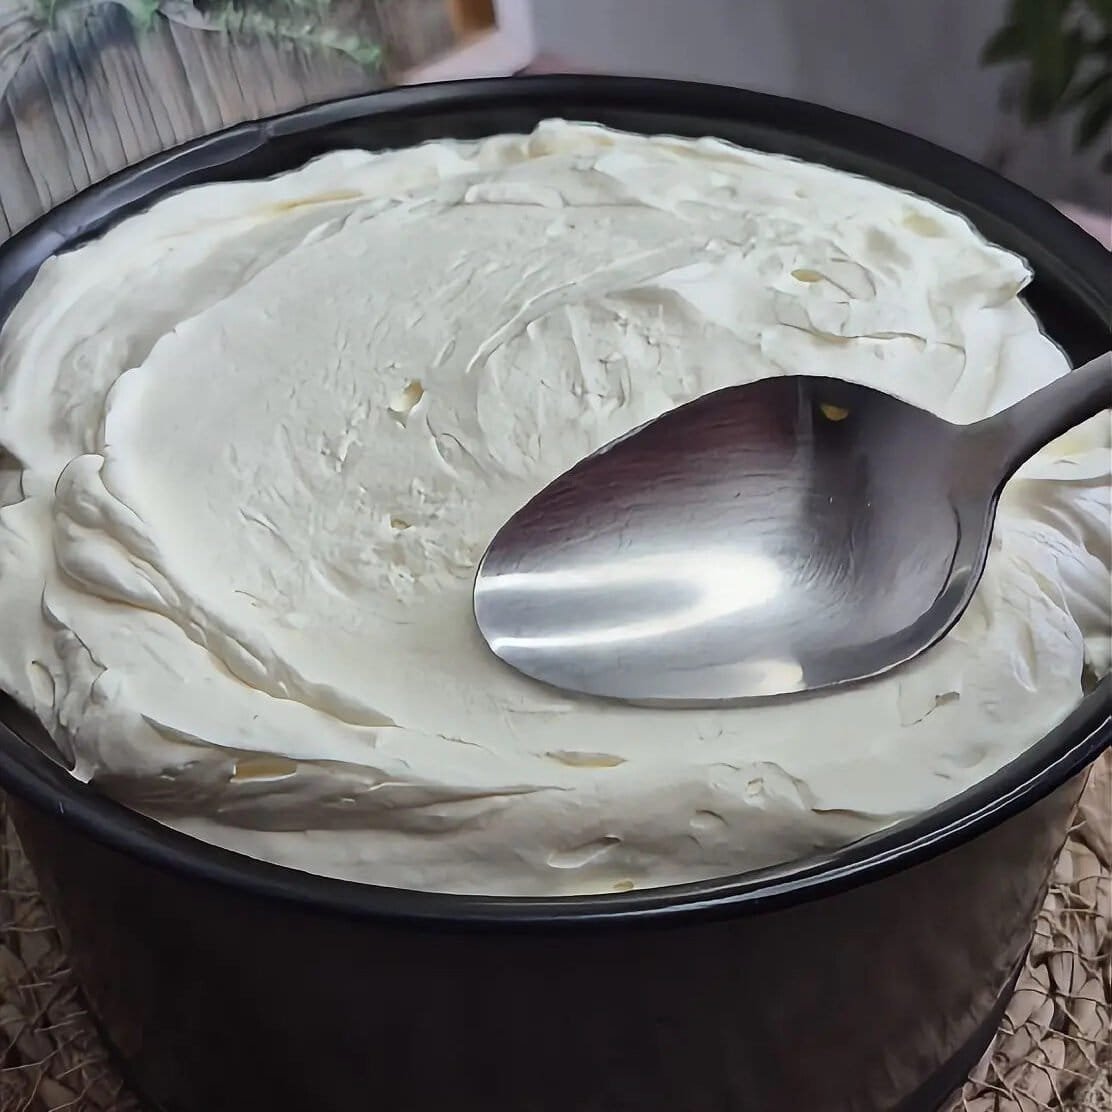
Mascarpone gives the filling body. It should be cold, but not rock hard, so it whips smoothly.
Powdered sugar sweetens the filling without leaving a grainy texture.
Whipping cream lightens the mascarpone and makes the filling easier to spread.
Gelatin sheets help the cake hold its shape. This matters because the filling is soft and rich, and without some support it would not slice as neatly.
Nutella goes into one half of the filling. It changes both the colour and flavour of that layer, and it ties the chocolate base to the cherries nicely.
For the cherry layer
Cherries are the main contrast in the cake. Fresh or frozen both work. If using frozen, let them cook a little longer if needed.
Sugar helps draw out the juices and rounds out the tartness.
Cornstarch thickens the mixture so it stays spoonable and does not leak into the cream.
Water is only there to loosen the cornstarch before it goes into the pan.
For decoration
Chocolate should be grated or shaved just before serving if possible. Fresh shavings look better and keep their texture.
How to make this cake step by step
1. Start with the chocolate base
Crush the cocoa biscuits until they are very fine.
Mix them with the melted butter and milk until the crumbs are evenly moistened. The mixture should hold together when pressed in your hand. If you still see dry patches of crumbs, mix a little longer before pressing it into the pan.
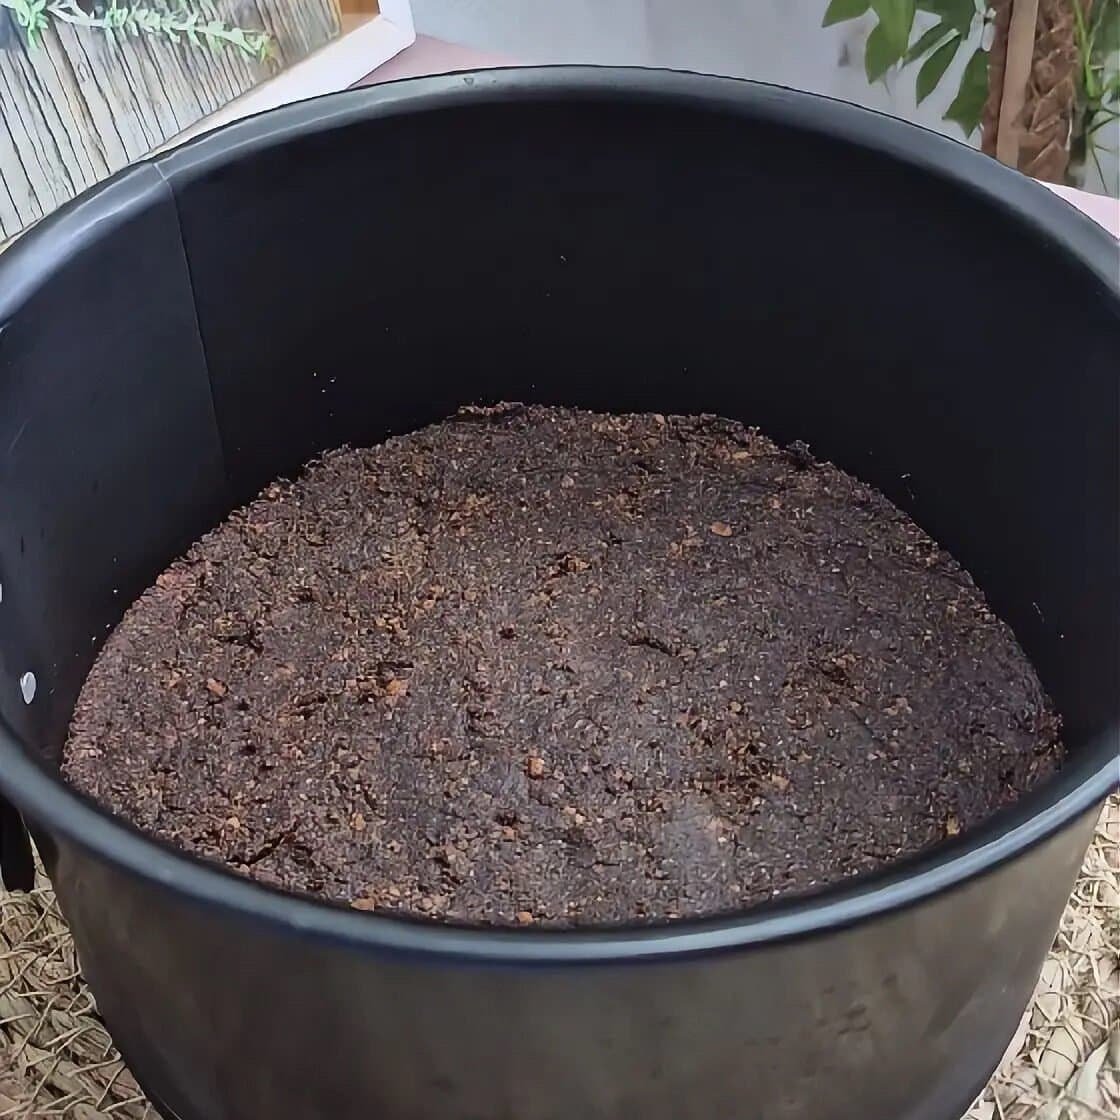
Once it is in the pan, press it down firmly and evenly. Pay attention to the edges as well as the centre. An uneven base will show up later when you slice the cake.
Chill the base while you make the filling and cherries.
2. Cook the cherries just enough
Put the cherries and sugar in a small saucepan and heat them gently.
As the fruit warms up, it will release juice. Stir now and then so the bottom does not catch. Once the juices start to come out, add the cornstarch mixed with water and continue stirring until the mixture thickens.
This part is quick. You are not making jam, and you do not want to cook the fruit down too much. The cherries should still look like cherries, with some texture left.
Take the pan off the heat and cool the mixture completely before layering it into the cake. Warm cherries will soften the cream and blur the layers.
Once cooled, divide the cherry mixture into two portions for assembly.
3. Make the mascarpone filling properly
Beat the mascarpone with the powdered sugar until smooth.
Do not overwork it. Mascarpone can loosen too much if beaten aggressively for too long. You just want it creamy and even.
In a separate bowl, whip the cream until thick. It should hold its shape but still look smooth, not grainy. Overwhipped cream makes the filling harder to fold and can give it a slightly rough finish.
Soften the gelatin in water, then melt it gently. Add it into the whipped cream so it distributes evenly before the cream gets folded into the mascarpone.
Once the cream and mascarpone are combined, divide the filling into two parts.
Stir Nutella into one part and leave the other plain.
4. Layer the cake in the right order
Spread the Nutella cream over the chilled chocolate base first.
This gives you a stronger bottom layer that sits well over the biscuit base. Try to smooth it evenly so the cherry layer that follows stays level.
Add the first portion of cherries over the Nutella cream. Spoon it gently rather than pouring it in one spot. That makes it easier to spread without dragging the cream underneath.
Next, add the plain mascarpone cream.
Spread it carefully all the way to the edges. This top cream layer should be as even as possible because it shows when the cake is unmoulded.
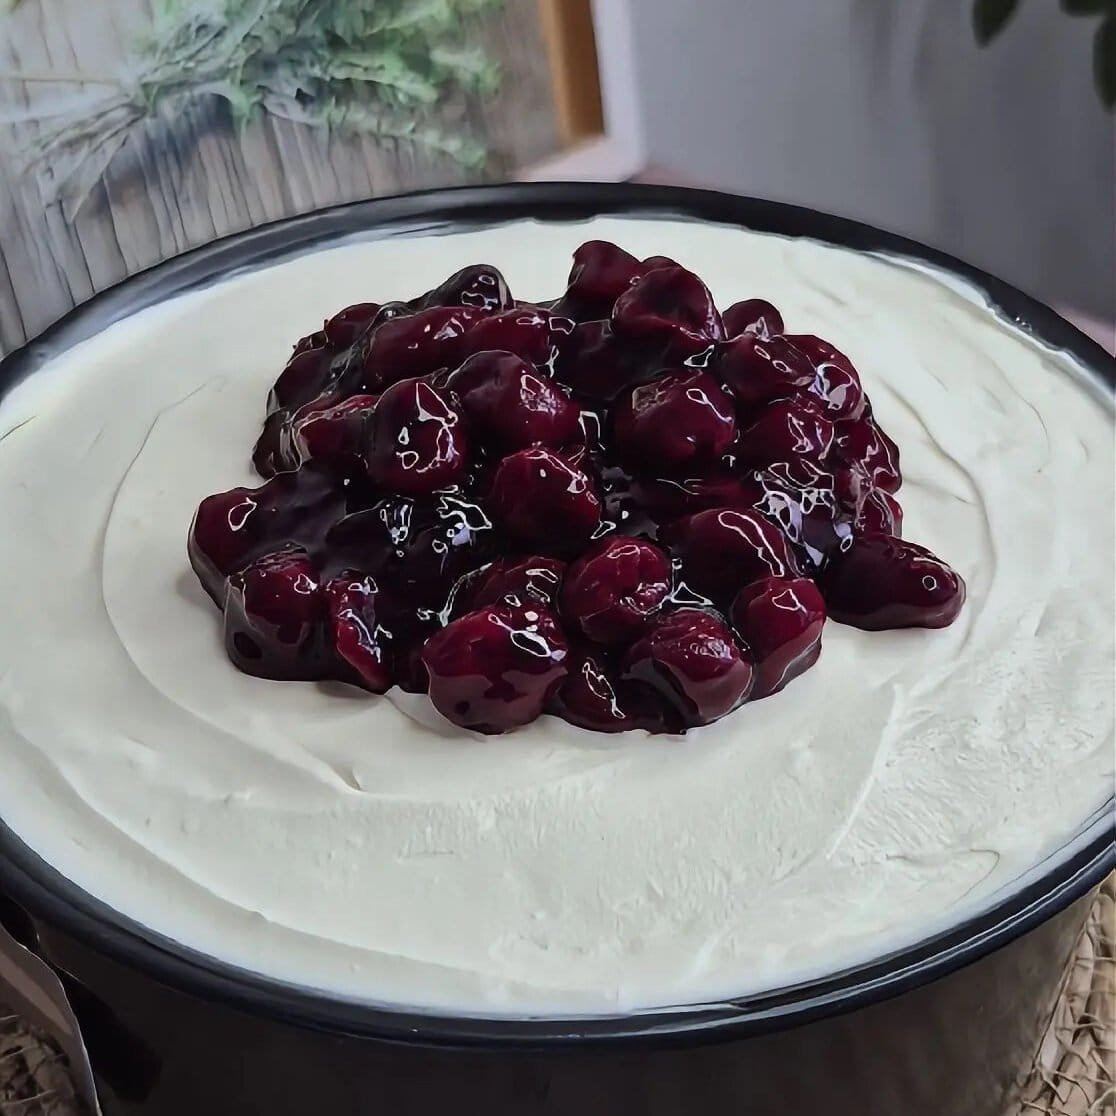
Finish with the second portion of cherries on top.
You can spread them into a full layer or keep them a little looser, depending on how you want the top to look once the chocolate goes on.
5. Chill until fully set
This cake needs proper fridge time.
A few hours is the minimum, but an overnight rest gives the cleanest slices. The base firms up, the filling settles, and the cherry layer holds better.
Do not rush this step. If the cake is cut too early, the cream will still be soft and the layers will not stay sharp.
6. Decorate just before serving
Once the cake is cold and set, add grated or shaved chocolate over the top.
You can keep it simple and cover the surface evenly, or pile a little more in the centre. Both work. What matters more is using enough chocolate to give contrast against the cream and cherries.
Then slice with a clean knife, wiping it between cuts if you want a neater finish.
Tips for the best result
Use full-fat mascarpone and proper whipping cream. This is not the place for reduced-fat substitutes. The texture will not be the same.
Let the cherry layer cool completely before assembly. This is one of the easiest ways to avoid a messy cake.
Do not overbeat mascarpone. Once it turns loose, it does not really come back.
If the Nutella is too stiff, loosen it slightly before mixing it into the cream. That will help you keep the filling smooth.
Press the base firmly. A loose base may hold in the fridge, but it will fall apart when sliced.
Line the base of the pan if you want easier lifting later. It saves trouble when serving.
For cleaner slices, chill the cake overnight and use a sharp knife dipped in warm water, then wiped dry.
Easy variations
You can leave out the Nutella and make both layers plain if you want a more classic cream profile. The cake will still work.
You can also use dark chocolate shavings instead of milk chocolate for a sharper finish.
If your cherries are very sweet, reduce the sugar in the fruit layer slightly. If they are tart, keep the amount as written in the recipe card.
Fresh cherries usually give a slightly firmer result, but frozen cherries are completely fine here and make the recipe easier to use all year.
Storage and make-ahead notes
This cake keeps well in the fridge for a few days.
Store it covered so the top does not dry out and the chocolate does not absorb fridge smells.
It is actually better on the second day than the first few hours after making it. The layers settle, the base firms up, and the flavour comes together more clearly.
I would add the chocolate topping close to serving time if possible, especially if you want the shavings to look fresh.
Freezing is possible, but the texture of mascarpone desserts is always best from the fridge, not straight from the freezer.
No-Bake Black Forest Cake with Cherries and Chocolate
Ingredients
For the chocolate base
- 200 g cocoa biscuits finely crushed
- 100 g butter melted
- 50 ml milk
For the cream filling
- 500 g mascarpone cheese
- 3 tbsp powdered sugar
- 500 ml whipping cream
- 2 gelatin sheets
- 3 tbsp Nutella
For the cherry layer
- 300 g cherries fresh or frozen
- 2 tbsp sugar
- 1 tbsp cornstarch
- 2 tbsp water
For decoration
- 100 g chocolate grated or shaved
Instructions
Make the base
- Crush the cocoa biscuits into fine crumbs.
- Mix the crumbs with the melted butter and milk until the mixture is evenly moistened.
- Press the mixture firmly into the base of a 20 cm cake ring or springform pan.
- Place in the fridge while preparing the filling and cherry layer.
Make the cherry layer
- Add the cherries and sugar to a small saucepan.
- Cook over gentle heat, stirring occasionally, until the fruit releases some juice.
- Mix the cornstarch with the water in a small bowl.
- Pour the cornstarch mixture into the saucepan and stir for about 1 minute, until thickened.
- Remove from the heat and let the cherries cool completely.
- Divide the cherry mixture into 2 portions.
Make the cream filling
- In a large bowl, whip the mascarpone with the powdered sugar until smooth.
- In a separate bowl, whip the cream until thick.
- Soak the gelatin sheets in cold water until softened, then melt them gently.
- Mix the melted gelatin into the whipped cream.
- Fold the whipped cream into the mascarpone mixture until fully combined.
- Divide the filling into 2 equal parts.
- Stir the Nutella into one half of the filling.
Assemble the cake
- Spread the Nutella cream over the chilled chocolate base.
- Spoon over one portion of the cherry mixture and spread gently.
- Add the plain mascarpone cream and smooth the top.
- Spoon over the remaining cherry mixture.
Chill
- Refrigerate the cake for at least 4 hours, or overnight, until fully set.
Decorate
- Before serving, cover the top with grated or shaved chocolate.
- Slice and serve chilled.
Notes
- Make sure the cherry layer is completely cool before assembling the cake.
- Do not overwhip the mascarpone or the cream.
- For the cleanest slices, chill the cake overnight.
- Frozen cherries work well; no need to wait for cherry season.